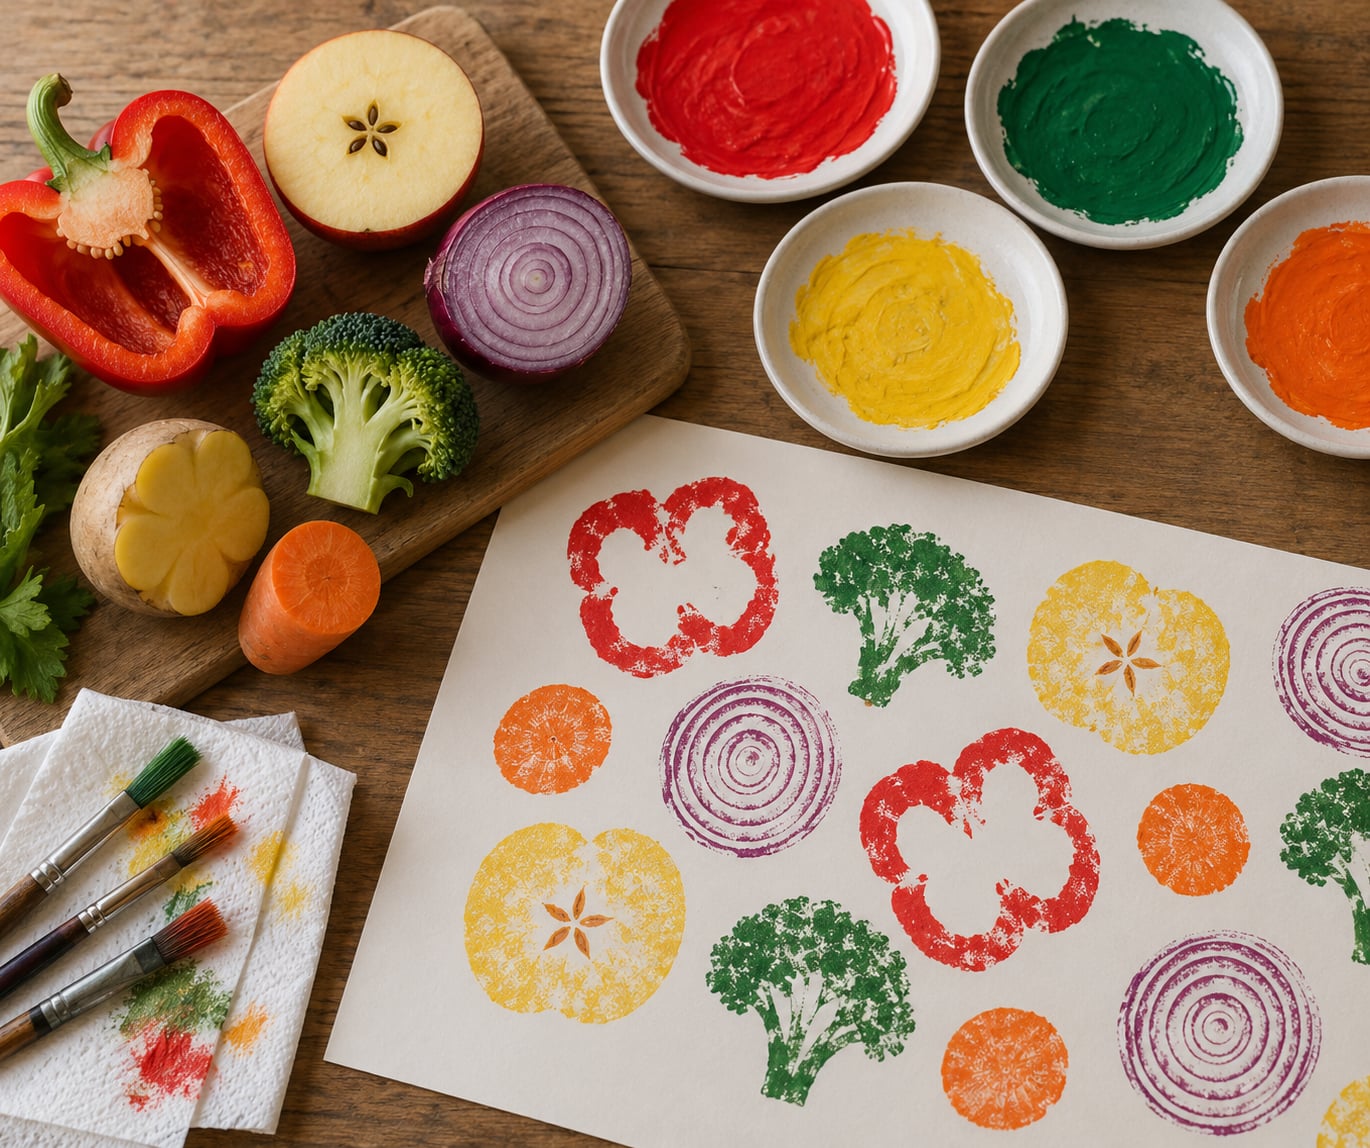
To print with vegetables and fruit, cut the produce in half to expose a flat face, coat that face with washable paint, press it firmly onto paper, and lift it straight up. The whole activity takes about five minutes of setup and fifteen minutes of hands-on work, and it works for children from about age two upward.
It is one of the cheapest ways to introduce a young child to real printmaking. You need a plate of paint, some paper, and whatever is soft in the crisper drawer, and the results are monoprints, which means every impression is single and unique. Nothing else in the kitchen drawer does quite that.
Most of the difference between a good print and a disappointing one comes down to three things: a flat cut face, paint that is not too wet, and firm pressure held still for a second. Get those right and the technique is genuinely forgiving. This guide walks through the supplies, the full process, and the fixes for the problems that trip up almost everyone on the first try.
Table of Contents
- What You Need
- Step-by-Step: How to Print With Vegetables and Fruit
- Wash and Prepare the Produce
- Choose Paper and Arrange the Print Shapes
- Apply Paint and Press the Produce
- Lift, Reveal, and Add Finishing Details
- Common Mistakes and Easy Fixes
- Frequently Asked Questions
- What vegetables and fruit work best for printing?
- Can I use regular kids’ paint for vegetable printing?
- What paper should I use for fruit and vegetable prints?
- How do I get a clear print instead of a blurry one?
- How do I stop the produce from tearing when I lift it?
- Can I use the same produce for multiple prints?
- Start With One Simple Print
What You Need
The core kit is short. Everything beyond the produce itself is standard craft stock, and you can substitute almost anything you already have at home.
- Washable tempera paint or washable finger paint. Water-based and nontoxic is the standard for anything a toddler might touch.
- A shallow tray or paper plate to lay paint out in a thin film, plus a spare plate if you are using more than one color.
- Sturdy paper. White cardstock, heavy construction paper, or a roll of printer paper taped to the table. Thin paper buckles under a wet stamp.
- Fresh produce. Fruit and vegetables with a broad flat face, firm texture, or a distinctive natural pattern.
- Paper towels for wiping the produce and your hands between colors.
- A short tablecloth or plastic sheet under the work area, plus an apron or art smock. Treat the smock as essential gear rather than optional, because paint finds clothes.
- One sharp knife and a board, for an adult to do all the cutting.
Useful extras: a sponge or stiff brush for pushing paint onto cut faces, a small rolling pin to roll a stubborn stamp flat, markers and crayons for finishing touches once the paint is dry, and clear contact paper or a laminator if you want the prints to last.
Choosing produce is easier when you think about the cut face rather than the whole item. A cross-section that is wide, level, and slightly wet inside gives the cleanest transfer. Peppers, onions, apples, oranges, and cabbages have a broad flat interior. Carrots and celery have small faces but distinctive patterns, which makes them good for repeated marks and lines rather than single big shapes.
Wilted produce is fine, and it is often the best use for it. A slightly soft apple still prints well. A shriveled, slimy item is past the point where the surface will hold paint, and it is better in the compost.
Step-by-Step: How to Print With Vegetables and Fruit
Four stages, in this order. Do them in this sequence and the technique holds together.
Wash and Prepare the Produce
Rinse everything under cold running water, then dry it thoroughly with a towel. Surface moisture is what makes a stamp slip, so a wet apple will wander across the page no matter how well you press it.
An adult does all the cutting. Slice the item in half through the middle, straight across, so the cut face sits level. For a round vegetable like an onion or cabbage, cut crosswise to get concentric rings. For celery, corn, or a banana, cut lengthwise to get long lines and rows of seeds.
Pat the cut face with a paper towel before it goes near the paint. You want damp flesh, not wet flesh, and a 30-second blot is usually enough.
Two more things worth doing in advance. Set out a smock before the paint comes out, not after, and clear the surface of anything that stains easily. Parents tell us the laundry question is what decides whether the activity happens at all, so removing that worry first is the real prep work.
Choose Paper and Arrange the Print Shapes
Use paper heavy enough to stay flat under pressure. Cardstock and heavy construction paper both work; printer paper is fine if you tape the corners down first. Tape the sheet to the table or a large board, which stops a slippery stamp from dragging the paper across the counter.
Plan the layout before you paint anything. Leave a thumb-width of space between shapes, and start from the largest stamp and work down to the smallest. Prints that touch look like one accidental blot rather than a design, and a good beginner mistake is to lay out more stamps than fit with that gap.
For fabric and canvas, you need a different medium. Use water-based fabric screen printing ink rather than tempera, which sits on top of the fibers and flakes off once dry. Cotton and linen take ink best. Let the print dry fully, then heat-set it by ironing the reverse side with a cloth between the iron and the print, following the ink manufacturer’s directions. Keep the iron and the hot-setting step firmly in adult hands.
Apply Paint and Press the Produce
Put a thin film of paint into the shallow tray, no deeper than a coin. Dip the cut face straight down, lift it, and let the excess drip back for a second or two.
This is where first attempts usually fail. Thick paint pools in the low spots and prints as a blobby, uneven patch. Thin paint catches only the raised parts and prints as a faint ghost. The right thickness is a thin even wash, so add paint a little at a time rather than reloading the whole face.
Set the produce cut-side down on the paper, then press with the flat of your palm. Hold it still and press firmly for about one second, then lift. Do not slide it, and do not rock it to make the print look cleaner. A child who presses hard in the middle and lightly at the edges will get a print that fades out around the rim, so cue them to push down with the whole hand.
For a repeated stamp, a sponge or roller lays paint on more evenly than a brush and keeps you in a rhythm: paint, press, lift, re-dip, press, lift. Aim for about 20 to 30 seconds per print. If you are working with a very young child, do the painting yourself and let them do the pressing, which is the part they enjoy and the part that needs practice.
Lift, Reveal, and Add Finishing Details
Lift the produce straight up, slowly, in one motion. Pulling it sideways drags the wet paint and smears the first impression into a blur. If the print sticks, press a fingertip gently on the edges of the paper around it rather than pulling harder on the produce.
Set the stamped item aside on a scrap paper. Do not wipe it with a wet towel, because the residue leaves a film that makes the next print faint. Most washable print paint dries in 20 to 30 minutes, and a print is fully safe to handle once the surface no longer transfers to a fingertip.
Once dry, the print opens up. Add stems and leaves with markers, write the color names next to each shape, fill in gaps with a brush, or repeat a single stamp in a grid to build a repeat pattern. Cutting one item at different angles is the cheapest way to get variety from the same vegetable: a carrot cut crosswise gives rosettes, cut lengthwise gives long ridged strips.
Printed produce is done for art. Paint on the cut surface is not food safe, so toss the stamped pieces rather than serving them, and keep whole grapes, cherry tomatoes, and cut chunks away from children under three.
Common Mistakes and Easy Fixes
Most disappointing prints trace back to one of a handful of causes. Here is what went wrong and what to change.
The print is blurry or smeared. Almost always moisture. The stamp was wet, the paper was wet, or the produce slid while you pressed. Dry the produce face with a paper towel, tape down the paper, and press without moving.
The print is patchy with gaps. The paint was too thin or too thick. Bump up the paint film until it coats the whole cut face in one even layer with no bare patches, then blot the excess on a scrap before the first press.
The colors turned muddy. You are mixing. Paint one color, press several prints, then wash the stamp face or wipe it, and only then reach for the next color. Keep a separate plate and a separate sponge per color, and work one color at a time until the paper dries.
The produce tore or crumbled on lifting. It was overripe, the cut face was too thin, or you pulled instead of lifted. Choose firmer items, cut a face with some depth to it, and lift vertically in a single steady motion.
The shape keeps slipping. Wet produce, or a slick plastic plate. Dry the face, use a matte tray or textured cardboard instead of smooth plastic, or tape a cut half of a sturdy vegetable to a block of cardboard with masking tape and print with that.
The paper curled or buckled. Water. Use heavier paper, lay the sheet over a flat board, and if you must use thin paper, print with thinner coats and smaller stamps.
Finished prints are curling and hard to keep. Flatten them under a heavy book between sheets of plain paper once fully dry, or laminate them for placemats and bookmarks.
Set up for the age you have. A two-year-old will explore with one color and no goal, and that is the right amount of ambition. Preschoolers can add spacing, color names, and simple composition. School-age kids can plan a repeat pattern and cut paper shapes to fill the gaps, which is where this becomes real printmaking rather than stamping.
Frequently Asked Questions
What vegetables and fruit work best for printing?
Anything with a broad, flat cut face prints best. Onions, apples, oranges, bell peppers, cabbage, and cucumber give large clean shapes. Carrots, celery, corn, and okra give smaller patterns, lines, and rosettes that work well in repeated rows. Broccoli and cauliflower give tree-like crosses, and citrus gives you two stamps in one, the flesh wheel and the pithy peel.
Can I use regular kids’ paint for vegetable printing?
Yes, washable tempera or washable finger paint is the usual choice because it is water-based, nontoxic, and rinses out of most clothing. A normal stamp pad also works well, especially for younger children, because it gives a thin, even film and puts almost no paint on their hands. Skip anything solvent-based or labeled permanent.
What paper should I use for fruit and vegetable prints?
Use cardstock, heavy construction paper, or printer paper taped to a board. Thin paper buckles the moment a wet stamp lands on it, and the print smears as the sheet lifts. A roll of kraft paper taped to the table works well for larger collaborative pieces. If you plan to laminate the prints later, test the paint on a scrap sheet first.
How do I get a clear print instead of a blurry one?
Three fixes cover almost every blurry print. Dry the cut face with a paper towel, press the produce straight down without sliding or rocking it, and hold firm even pressure for about one second before lifting. Lifting slowly and straight up matters just as much, since pulling the stamp sideways drags the wet paint into a smear.
How do I stop the produce from tearing when I lift it?
Use firmer produce, and cut a face with some depth rather than a wafer-thin slice. Lifting slowly in one vertical motion, with no twisting, keeps the print intact. If a piece is already soft or splitting, print it and then compost it. Painted produce is not food safe, so keep painted pieces away from anything you plan to serve.
Can I use the same produce for multiple prints?
Yes, that is the normal way to work. Re-dip and re-press the same cut face as many times as you like, and most washable print paint cleans off with warm water and a scrub brush. Wipe between colors with a damp paper towel, but a thorough rinse works better, because any film left on the surface makes the next print faint.
Start With One Simple Print
Pick one firm, flat-sided vegetable or fruit. Halve it, pat the cut face dry, spread a thin coat of washable paint over it, press it straight down on heavy paper, and lift slowly.
That is the whole method, and it takes about a minute. Do it once before you set out eight types of produce, because the first clean print tells a child what the activity is, and the rest of the session builds on it. Add a second color, then a stem and a leaf, once the first print has dried.