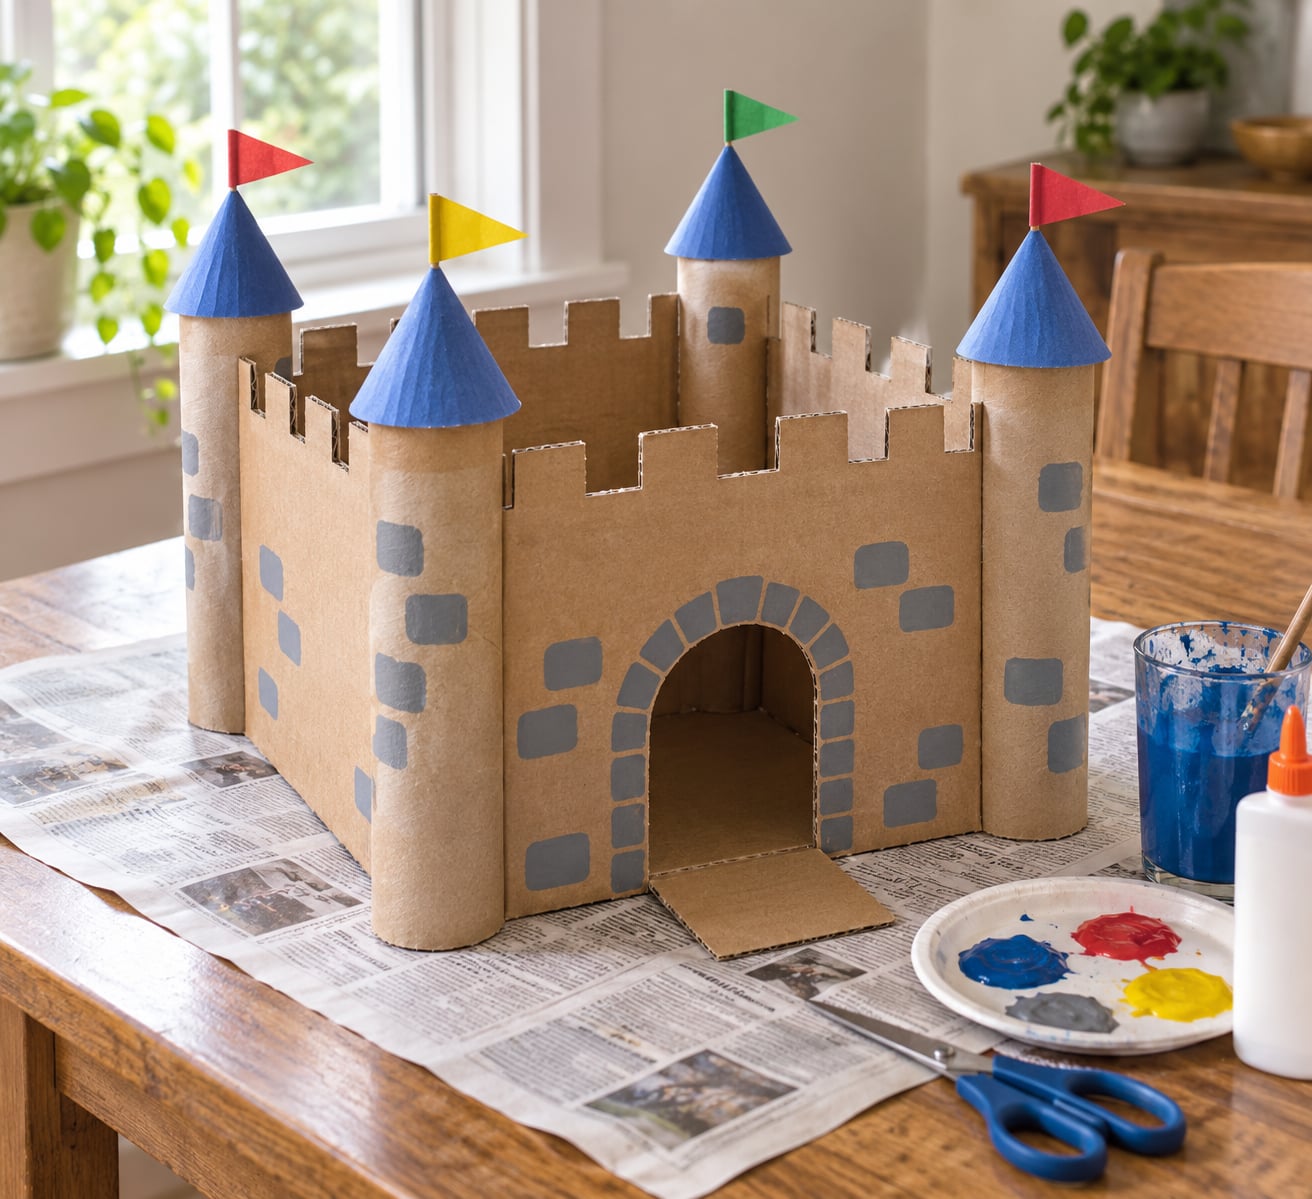
To make a cardboard castle for kids, you cut one large box into walls, slot paper towel rolls into the corners as turrets, and lock the pieces together through slits cut in each part. The slots carry the load, tape just holds it. Give yourself about an hour and the recycling pile becomes the best pretend-play corner in the house.
Cost is close to nothing if you use what is already in the cupboard. A mid-size castle needs one moving box and four paper towel rolls; a smaller tabletop version works from a single shoebox.
One grown-up does every cut, and the children paint. That split is the reason these projects work: the knife stays in adult hands while the kids still feel like they built the castle themselves.
Table of Contents
- What You Need
- Where the cardboard comes from
- Pick the size before you start
- Step-by-Step: How to Make a Cardboard Castle for Kids
- Choose and Flatten the Cardboard Boxes
- Plan the Castle Shape
- Cut the Walls and Towers
- Assemble the Castle
- Add Doors, Windows, and Battlements
- Decorate the Cardboard Castle
- Add Play Details and Finish
- Common Mistakes
- Frequently Asked Questions
- How long does it take to make a cardboard castle?
- What is the best glue for cardboard?
- How do you make cardboard turrets stand up?
- How big should a cardboard castle be so a child can sit inside?
- Can I build a cardboard castle without a hot glue gun?
- What age is a cardboard castle suitable for?
- Build a Castle That Lasts
What You Need
Most of this list is already in your kitchen drawer or recycling bin. Shopping only happens if your house is unusually tidy.
- One large corrugated box for the walls: a moving box, an appliance box, or three shipping boxes taped together edge to edge
- Four paper towel rolls for corner turrets, or two toilet paper rolls if you are building smaller
- A utility knife with fresh blades — adult use only
- Scissors — child-safe, for the decorating stage and younger helpers
- A ruler and pencil for marking straight lines before cutting
- Duct tape or packing tape for structural joints
- Washable acrylic or tempera paint, plus brushes or a sponge roller
- Newspaper or a drop cloth to protect the floor
- Optional: a bamboo skewer and paper for a flag, yarn for a drawbridge, coins or pebbles for texture
If no oatmeal canisters are on hand, do not let that stop you. Round turrets look best, but a milk carton cut to a square tower works the same way, and a cereal box makes a fine small keep. Paper towel rolls are the easiest of all because they are already the right height for a preschooler to sit inside.
Where the cardboard comes from
For a life-size build you need far more than one household produces, so ask around. Bottle shops hand over wine boxes free, appliance stores often keep the large boxes by the loading door, and neighbours with recent deliveries are usually glad to be rid of them. The cheapest supply line is simply asking the delivery driver to keep the boxes.
Pick the size before you start
- Tabletop castle. One shoebox or cereal box plus 4 toilet paper rolls. Roughly 30 to 40 minutes. Best for small-figure and dollhouse play, and it fits a small room.
- Mid-size play castle. One or two moving boxes plus 4 paper towel rolls. Roughly 60 to 90 minutes. Best for children ages 3 to 7 and indoor play.
- Life-size indoor fort. Six or more boxes, or one appliance box. A relaxed weekend. Best for older kids who crawl inside, or for a birthday party.
Step-by-Step: How to Make a Cardboard Castle for Kids
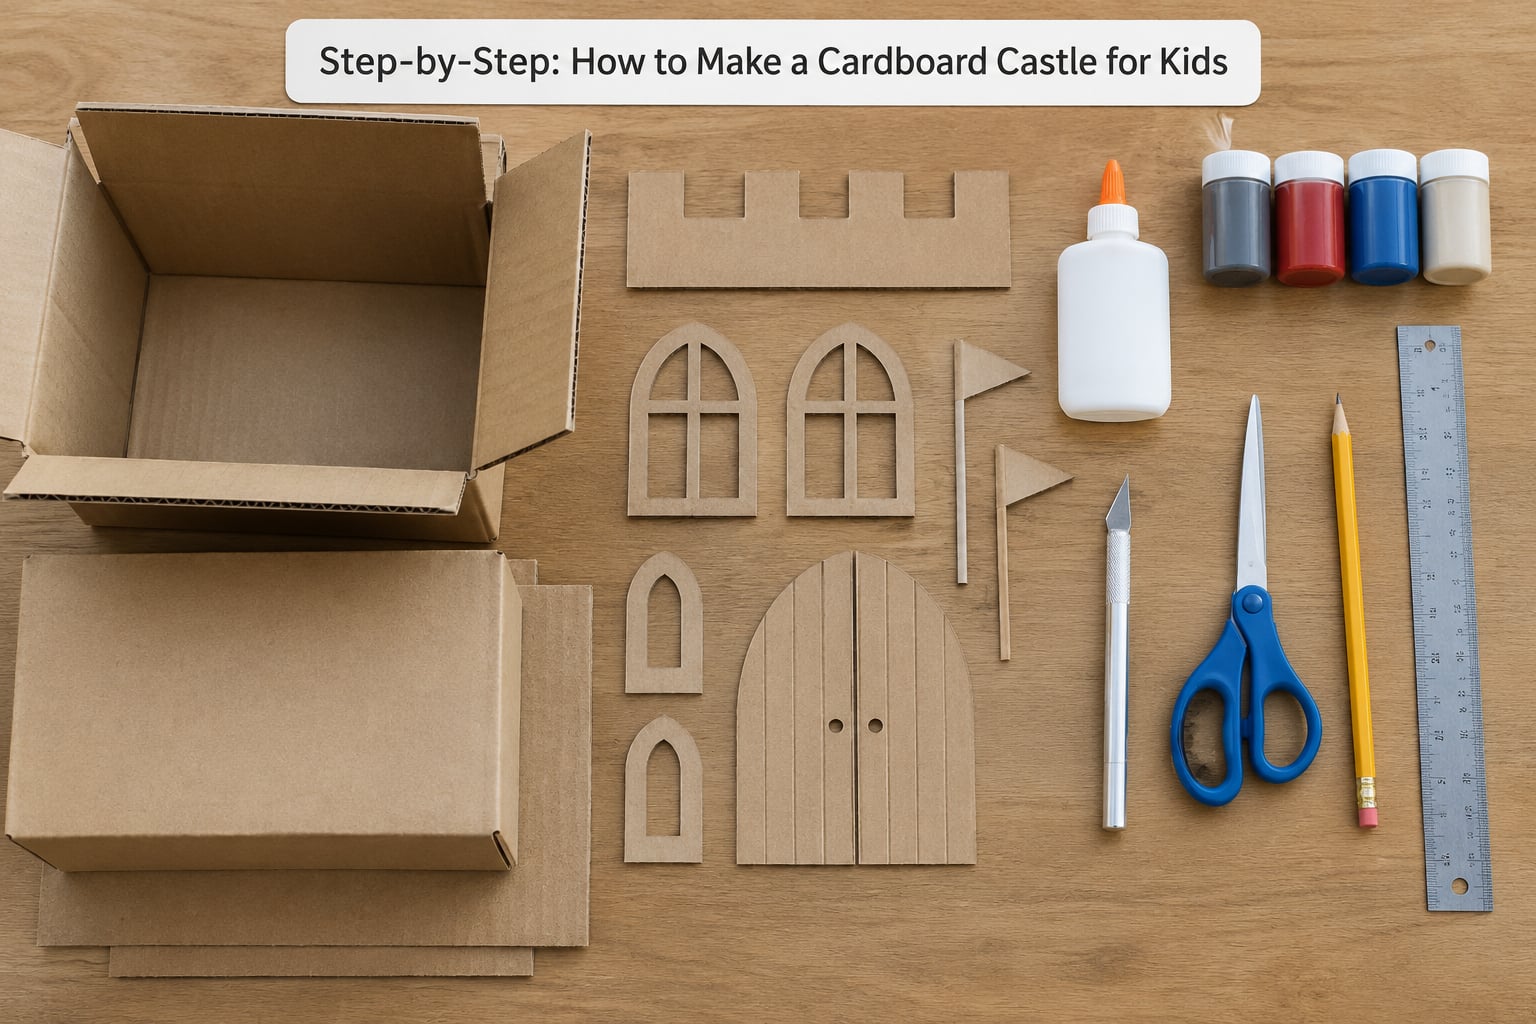
The whole build rests on one idea: cut a slot in the wall and a matching slot in the tower, then slide them together. Do that at every corner and the castle holds itself up.
Choose and Flatten the Cardboard Boxes
Pick boxes of roughly the same height so the wall tops line up. Two different sizes are fine, but a castle with a stepped roof reads as deliberate rather than wonky.
Remove staples with the flat end of the knife, prying gently so the cardboard does not tear, then fold the box flat along its existing creases. You know it is flat when the panel lies still with no bubbles and the edges line up.
Decide now whether the front stays open or gets a wall too. An open front makes a better play cave and saves a large cut; an enclosed box suits a cold-weather fort or a castle with an interior room.
Plan the Castle Shape
Sketch the layout in pencil before cutting anything: four walls, the doorway and windows, and a tower circle in each corner. Measure the height of your paper towel roll and mark that line all the way around the box so every turret sits level.
Draw the battlements — the notched pattern along a wall top — as a row of small squares. Working from a marked grid keeps the notches the same size, which is the difference between a castle and a torn edge.
Cut the Walls and Towers
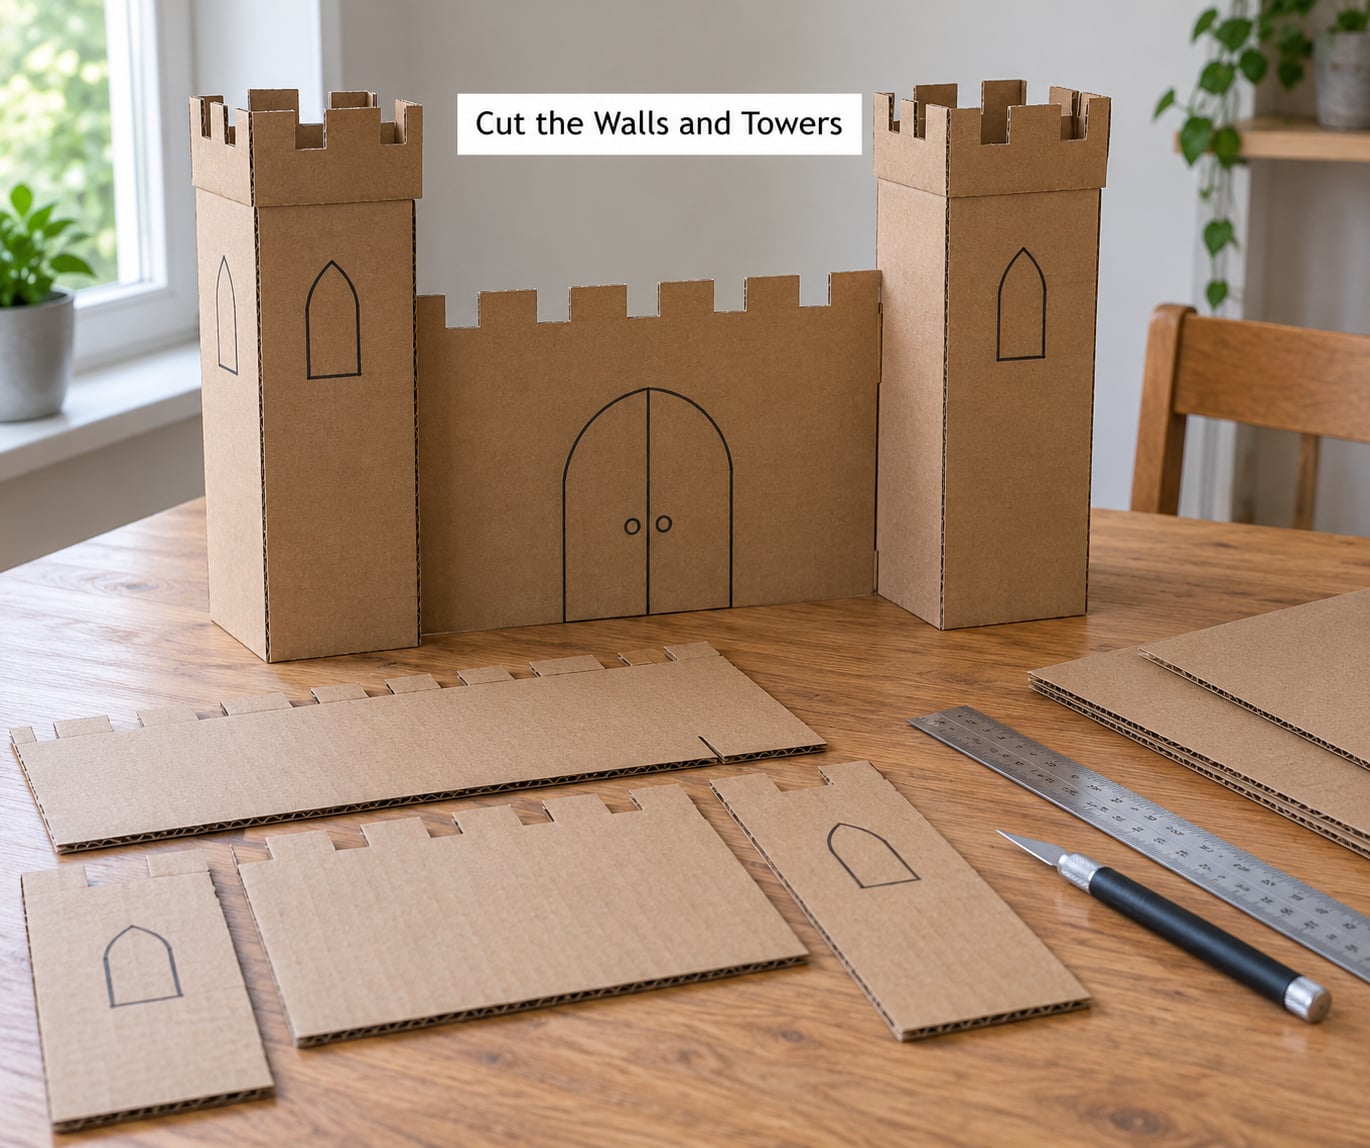
Adults cut with a utility knife on a cutting mat, scoring first and going through on the second pass. Score the slot lines rather than cutting them in one go; scored cardboard folds cleanly and stops the blade from wandering.
Children can help safely by cutting window shapes from spare cardboard with scissors, tearing strips for the crenellations, or holding pieces in place. Anyone holding a tower steady should stand on the flat side, away from the blade’s path.
Cut the towers a little taller than the wall line and make a vertical slit down each one, from the top edge to just short of the bottom. Slide a wall into that slit and the joint locks without any glue at all.
Assemble the Castle
Stand the back wall up first, add a side wall, then slide each tower onto the corner where the two meet. Check that every corner tower sits square before you tape anything.
Run duct tape along the inside of each joint and wrap it around the outside edge. Inside tape carries the structural load; outside tape stops the corner peeling open.
Tape the base panel down to the floor of the play area, or weight it with a few books if a child will crawl inside. The test is a firm shove against the middle of a wall — if it flexes, add a second length of tape along that seam.
Add Doors, Windows, and Battlements
Cut the doorway as an arch: draw a half-circle at the top of the rectangle, then cut up the sides and around the curve. Children who are not ready for a knife can trace the arch and have an adult cut it later.
Punch the windows straight through, then trim the openings with extra cardboard strips for a thicker frame. Lining an opening with a strip stops the cut edge from fraying, which matters more than it sounds once a child starts pushing fingers through it.
Glue the notched cardboard strips along the wall tops for battlements, and add a coin-corner strip as trim. Cut flags from tissue paper and tape them to a bamboo skewer for the towers.
Decorate the Cardboard Castle
This is the children’s stage. Washable acrylic paint, markers and stickers all work, and tempera paint washes out of cardboard fibres that a sponge will not lift.
Lay down newspaper first, then paint the walls in broad strokes before anyone reaches for a detail brush. Fill windows and doors in flat colour rather than freehand pictures so the castle still looks like a building.
Let it dry somewhere the dog cannot sit on it, and check the timing. Paint needs a few hours to stop feeling tacky, and full dryness takes a day — which is why decorating the day before play works best.
Add Play Details and Finish
Hang a sign over the door on yarn or a paper strap. A cardboard plank propped against the entrance makes a drawbridge a child can raise on a hinge made from a folded strip of tape.
Fill the castle with whatever the child plays with: stuffed animals, small figures, a torch made from a painted cardboard tube. A castle with a story inside gets used for hours, and that is the part parents describe as the real payoff.
Do a final safety pass. Check every cut edge for a flap, sand or tape over anything sharp, and remove small trim pieces small enough to swallow. The checks happen on day one, and again whenever the castle gets dragged from room to room.
Common Mistakes
- Towers that fall over. Usually the slot is wider than the wall thickness, so the joint has nothing to grip. Re-cut it to the thickness of the cardboard, then reinforce with tape on the inside.
- Torn cardboard. The knife dragged or the blade went dull. Score the line first, change the blade every few cuts, and cut on a sacrificial sheet rather than across the finished panel.
- Crooked cuts. No straightedge. Measure with a ruler, pencil every notch, and cut against a scrap piece of card acting as a fence.
- Paint flaking off later. It went on over tape or dusty corrugation. Wipe the surface first, and keep tape away from the areas being painted.
- Weak glue joints. PVA on its own gives a stiff, brittle bond in cold weather. Use it only for trim and decoration, not for structure.
- Choking hazards. Coins, loose beads, and small flag pieces come loose fastest. Skip hard little details on any castle built for a child under three.
On hot glue: keep the gun in adult hands, set it on a heatproof surface, and never leave it within reach while children are in the room. It burns fingers quickly and it is not needed for a structurally sound castle.
Frequently Asked Questions
How long does it take to make a cardboard castle?
A tabletop castle from a single shoebox takes about 30 to 40 minutes. A mid-size castle from one or two moving boxes with four paper towel roll turrets takes 60 to 90 minutes including drying time. A life-size indoor fort needs most of a weekend because of the amount of taping involved. Add a full day for paint to dry before children play inside it.
What is the best glue for cardboard?
For structure, tape beats glue. Duct tape on both sides of a joint gives the strongest hold and works in a cold room, which is where PVA and hot glue both suffer. School glue is fine for trim, windows and decorative pieces. Hot glue adds speed rather than strength, so use it for quick fixes and keep it away from children.
How do you make cardboard turrets stand up?
Cut a vertical slit in each tower from the top down to about an inch above the base, then slide the wall into it. The slot grips the cardboard and holds the tower upright with no adhesive at all. Tape the joint inside and out afterwards, and check that the slot width matches the wall thickness or the tower will sit loose and wobble.
How big should a cardboard castle be so a child can sit inside?
Measure the tallest child and make the inside height at least six inches taller than that. A paper towel roll tower gives roughly that height for a preschooler, which is why most family builds end up life-size for a four-year-old. Wider is more useful than taller, and leave one wall open so an adult can get in and out to tidy up.
Can I build a cardboard castle without a hot glue gun?
Yes, and it usually ends up sturdier. Slots cut into the towers and walls do the structural work, and duct tape secures the joints. Hot glue is convenient for attaching small trim pieces, but a build that relies on it can fail when the glue cools or when someone runs out of sticks, which happens more often than you would expect mid-project.
What age is a cardboard castle suitable for?
Ages three and up work well, with the tasks split by age. A three-year-old can paint, choose colours and tear paper for battlements while an adult does every cut. A five-year-old can trace lines and cut windows with scissors. Children aged seven and up can plan the shape, measure the slots and assemble the towers themselves.
Build a Castle That Lasts
Start with a wide base and slot every joint properly, and the walls will not flop the first time a child runs into them. Give the tape and the paint a full day before anyone plays inside.
Then hand over the paint and let the decorating be theirs. Half the enjoyment is the making, and half is the knock on the door from someone who believes they are the king of the keep.