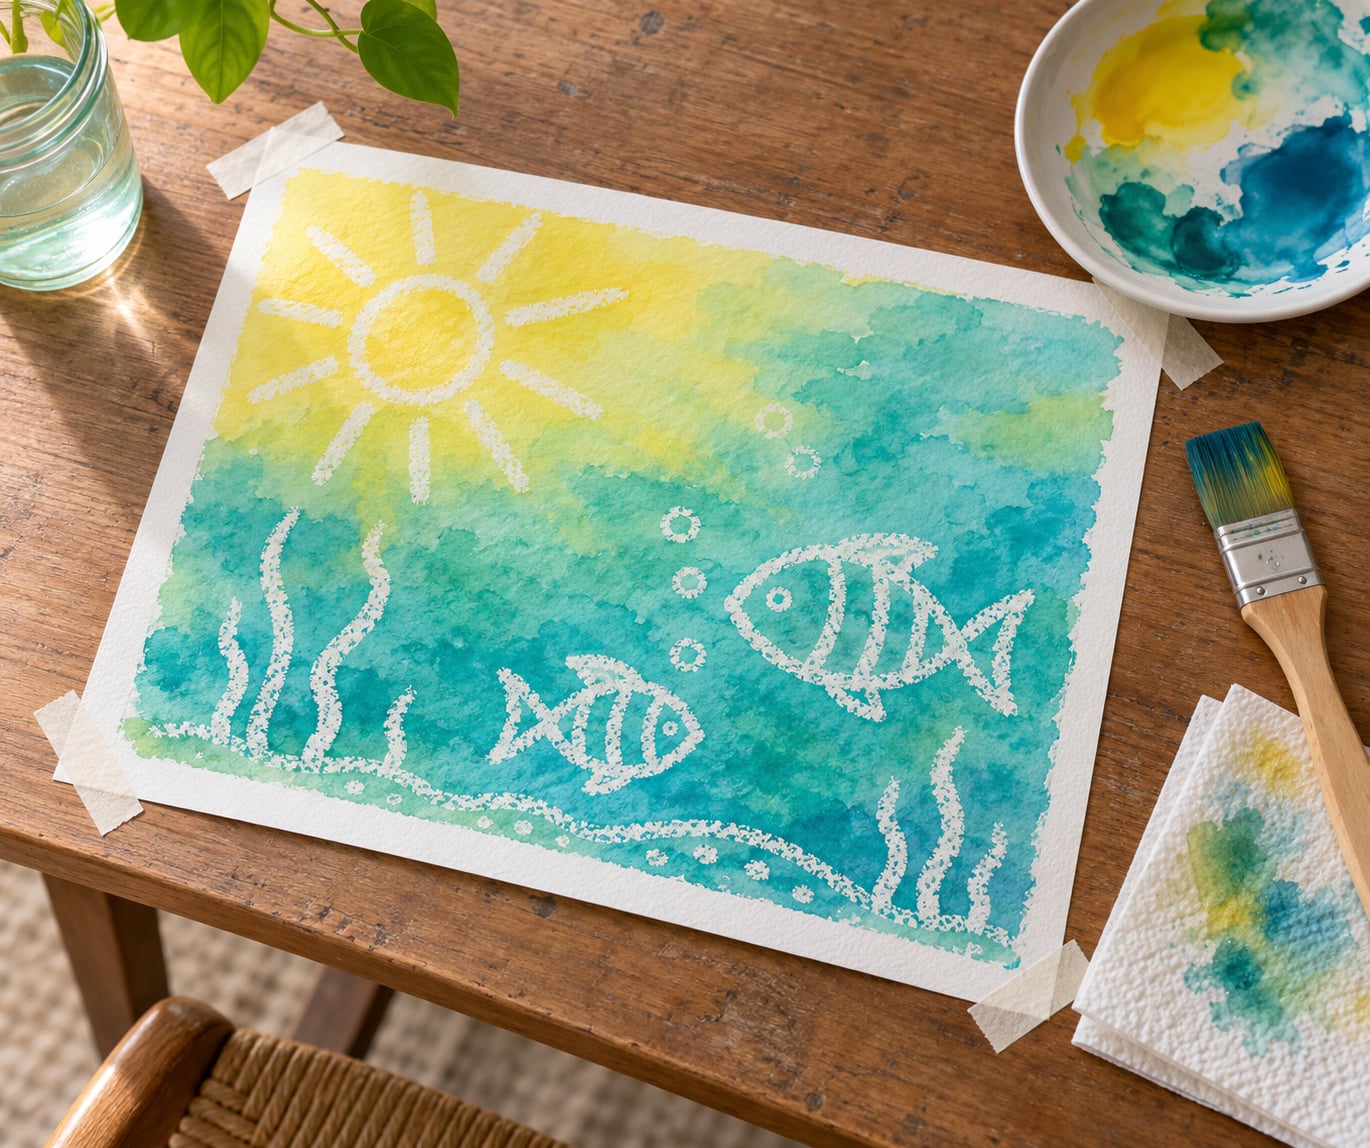
Crayon resist watercolor painting is a technique where you draw your design in wax crayon first, then brush watery paint over the whole page, and the wax lines stay clean while everything around them takes color. There is no brush skill to learn and nothing expensive to buy, which is why it is the first watercolor project I hand to almost any child who walks through the door. The whole thing takes about five minutes to set up and twenty minutes of active painting, and the hardest part is pressing the crayon down hard enough.
Kids chase the reveal. A page goes in looking like a scribble, comes out looking like stained glass, and the moment that happens they want to do another one. That reaction is why this shows up in every early childhood classroom I know of, and why art teachers use it as a first watercolor experience: it produces something that looks intentional even when the painting was a mess. Grown-ups without any drawing confidence do just as well with it, since patterns, spirals and random lines work as well as a recognizable picture.
One warning before you start. An adult artist I know tried this cold and posted that it was much harder than it looked. She was right, mostly because she used thin paper and paint that was far too concentrated. Both mistakes are easy to avoid, and I walk through them below.
Table of Contents
- What You Need
- How to Do Crayon Resist Watercolor Painting, Step by Step
- 1. Draw a simple design with wax crayon
- 2. Prepare the painting surface
- 3. Paint around the crayon lines
- 4. Add color and blend the background
- 5. Finish and display the artwork
- Common Mistakes and Easy Fixes
- Frequently Asked Questions
- Do regular crayons work for crayon resist watercolor painting?
- What kind of paper works best for crayon resist art?
- How do you keep watercolor colors from mixing together?
- Why do my crayon lines disappear when I add paint?
- How long does a crayon resist watercolor project take?
- Conclusion: Start with a Simple Design
What You Need
Everything here is inexpensive, and most households already own two or three of these items. A crayon box and a cup of water are the whole entry fee.
| Supply | What works best | If you don’t have it |
|---|---|---|
| Paper | Watercolor paper, cardstock, or poster paper | Thick drawing paper; never thin copy paper |
| Crayon | White or any wax crayon, jumbo size if you can get it | A white wax candle, or an oil pastel |
| Paint | Student-grade watercolors, cake or pan | Diluted food coloring in water, or thin finger paint |
| Brushes | One wide flat brush, one smaller round brush | A clean paintbrush and a sponge |
| Water | A cup for rinsing plus a cup for clean water | A spray bottle |
| Palette | A plastic plate or ice cube tray | A white plate, or the lid of a baking tray |
| Protection | Paper towels, newspaper, an old tablecloth | A sheet of newspaper under everything |
| Optional | Masking tape, salt, a dropper | Nothing; the basic method needs none of it |
On the wax candle substitute: parents mention it in community groups constantly, and it works because it is the same wax. Draw with the side of the candle held on its edge for a thicker line. The drawback is that it is fiddly for small hands and breaks if pressed like a crayon.
How to Do Crayon Resist Watercolor Painting, Step by Step
The process is five steps: draw, prepare, paint, layer, finish. The wax crayon creates a barrier that the watery paint cannot soak into, so the color stays off your lines.
1. Draw a simple design with wax crayon
Start with three to five large shapes, not a detailed scene. Circles, sun rays, fish outlines, a simple flower, thick scribbles filling an area, a name written in bubble letters. Any of these work, and a page with big open spaces between the lines is far easier to paint than a page packed with small details.
Press firmly. I mean lean into it until the crayon leaves a visibly waxy, slightly shiny line rather than a faint grey trace. This is the single most common reason the technique fails, and parents describe the result as hit or miss when their child simply was not pressing hard enough. If you want to check before you commit, touch a corner of the design with a damp fingertip. If the line stays bright and the paper barely darkens, the wax is thick enough to resist.
A test scrap of paper costs nothing. Most people draw a test line, press a little harder, and immediately understand what they were missing.
2. Prepare the painting surface
Lay your paper on a flat, protected surface and tape the edges down if the paper is large or a child is doing the painting. Paper that is not held down buckles and curls as it takes water, and a curled sheet is much harder to paint flat.
Squeeze out your paints onto a plate before anyone starts drawing. The paint should be closer to colored water than to paint. If it looks thick and glossy on the plate, add water until you can almost see through it. Nobody ever ruins a crayon resist project by adding too much water, and a lot of them ruin it by using paint straight from the pan.
3. Paint around the crayon lines
Load the wide brush with water first, then touch it into the paint. Start in the biggest open area and lay down a thin, even wash that covers the paper. Work in sections rather than trying to cover the whole page at once, because a page that dries as you go keeps its colors clean and vivid.
This is the step where most people learning how to do crayon resist watercolor painting lose their clean lines. Steer around the wax marks instead of scrubbing over them. You do not need to avoid them exactly, since the wax is doing the work, but extra brush strokes over a line can lift the wax and drag color across your design. Rinse the brush in clean water before you pick up a second color, and use a separate rinse cup per color if you are working fast.
You can tell this step worked when the paper around the lines is evenly covered and the lines are still the color you drew them in.
4. Add color and blend the background
Let each section dry before adding a contrasting color next to it. Wet paint next to wet paint turns into mud, and that is the other half of why results look disappointing. If you want to hurry, a fan at low speed works; a hairdryer held close can cockle or curl the paper, so keep it moving and well back.
Build up two or three layers rather than one heavy coat. Each layer goes on lighter than the last, so the color deepens without the wax ever getting stained. Once the page is dry, a dry brush dragged lightly across the background picks up the wax texture and gives the paper a soft speckled depth that a flat wash does not have.
A generous sprinkle of table salt on a still-wet wash pulls the pigment into branching crystalline lines as it dries. Blow on it before it sets so the salt comes off cleanly.
The finished look you are aiming for is clean crayon lines surrounded by an even wash, with the contrast between the two holding up from across the room.
5. Finish and display the artwork
Leave the piece flat until it is fully dry, which takes from half an hour to overnight depending on how heavy the wash is. To speed the end along, sandwich the dry-side-up page between two sheets of clean paper and press it under something flat and heavy. That also keeps a curling edge from doing damage.
Sign it in pencil or fine marker in a corner, on the painted background rather than across the resist lines. Once everything is dry you can add details with markers, pens, or paint on top, and the wax lines keep the drawing legible underneath.
For a hidden picture that stays secret until the paint goes on, draw on off-white or very pale grey paper instead of white. The design then remains invisible against the page and appears only where the wash covers it.
Common Mistakes and Easy Fixes
Almost every failed resist traces back to one of the same handful of causes. Work down this list before you start again.
The lines vanished under the paint. The crayon was pressed too lightly, or the color you drew with has no wax in it at all. A colored pencil, marker, or soft graphite will not resist anything. Go over the design again with a real wax crayon, pressing harder this time.
The paint colored the wax instead of sliding off it. The wash was too concentrated. Dilute it until it looks like colored water, and pass over each area once rather than repeatedly. Every extra pass gives the pigment more chances to sit on top of the wax.
The colors turned muddy. You painted into wet areas. Let each section dry before starting the next color, and rinse the brush before you change paint.
The paper tore or buckled. It was too thin, or it was not taped down. Move up to cardstock or watercolor paper. Thin copy paper tears when the wax is rubbed and curls badly the moment it gets wet.
The design smudged while painting. The wax was warm, or a sleeve or arm brushed the page. Keep the sheet somewhere out of traffic, and in hot weather let the drawing sit for a few minutes so the wax firms up.
The design was too complicated. Lots of thin lines, small gaps and lots of turns give the wash nowhere to sit. Fewer, bigger shapes produce a stronger result in less time.
The wash looked patchy. The paper drank the water unevenly. Either start with a damp sheet and paint into damp paper, or paint on completely dry paper. Going back over a dry area a second time leaves a tide line.
You cannot tell whether the wax worked. Do the damp fingertip test described in step one before you fill the palette.
For very young children, keep the project to one color and a handful of large shapes. Two thin brushes and one rinse cup are enough, and wiping hands on a wet paper towel keeps most of the mess contained. Wax transfers to hands and sleeves, and cold water plus a little dish soap lifts it; a warm iron on a cloth will take wax off clothing if you get to it quickly. Work on newspaper near a sink, and let the paper dry flat on a towel rather than over the edge of a table, where a drip will land on the floor.
Frequently Asked Questions
Do regular crayons work for crayon resist watercolor painting?
Yes. Any wax crayon works, including a white one for the classic reveal and colored crayons for a background layer. The only requirement is real wax, so a wax candle or oil pastel works too. Skip colored pencils, markers and paint pens, which contain no wax at all and will not resist anything. Jumbo crayons are worth hunting down, because they do not snap mid-line the way a well-used small crayon does. Whatever you draw with, press hard and let the line look waxy before you bring out the paint.
What kind of paper works best for crayon resist art?
Watercolor paper, cardstock, or poster paper all give good results. The deciding factor is weight and absorbency: the paper needs to take water without tearing or buckling into a curl, and it needs enough tooth for the wax to grip. Plain copy paper fails on both counts and is the most common cause of a disappointing result. Tape heavier sheets down before painting, and let them dry flat afterward so the edges do not curl permanently.
How do you keep watercolor colors from mixing together?
Paint in sections and let each one dry before you move to the next. Working wet paint into wet paint is what produces mud, not a bad color choice. Rinse your brush in clean water between colors, and keep a separate cup of rinse water per color if you are working quickly. Lighter colors first also helps, since you can always add a second layer over a dry wash, but you cannot take one back out.
Why do my crayon lines disappear when I add paint?
Two causes account for nearly all of these. First, the line was pressed too lightly, leaving a thin film the watery paint can sit on top of. Second, the paint was too concentrated, so the pigment colored the wax instead of sliding off it. Draw over your design again with firm, visible strokes, and dilute the paint until it looks closer to colored water than to paint. If the mark is still faintly visible after drying, keep painting over the area while it is wet, and the color will drift away from the wax.
How long does a crayon resist watercolor project take?
Allow about five minutes to set up the paper, paints and water, then twenty minutes of active painting for one page. Drying takes longer, from half an hour for a light wash to overnight for something heavily layered. You can leave it on the table, but a dry page pressed flat between sheets of clean paper under a heavy book will straighten out while you finish dinner. Children usually want to start the next one before the first has dried, so plan for two sheets at a time.
This process has not changed much over the years, and it stays the same for 2026: draw a few large shapes, press hard with the crayon, then brush a thin wash over the top.
Conclusion: Start with a Simple Design
Here is the whole method in one line. Draw with wax crayon and press hard, dilute the watercolor until it looks like colored water, paint around your lines in sections, and let each section dry before adding the next color.
Your first move should be small. Grab whatever thick paper is on hand and one crayon, draw three big shapes, and lay down a single light wash. Save that finished piece, then repeat it with a second color once the first has dried. Two pages is usually the point where the technique clicks for a child, and for an adult, too.