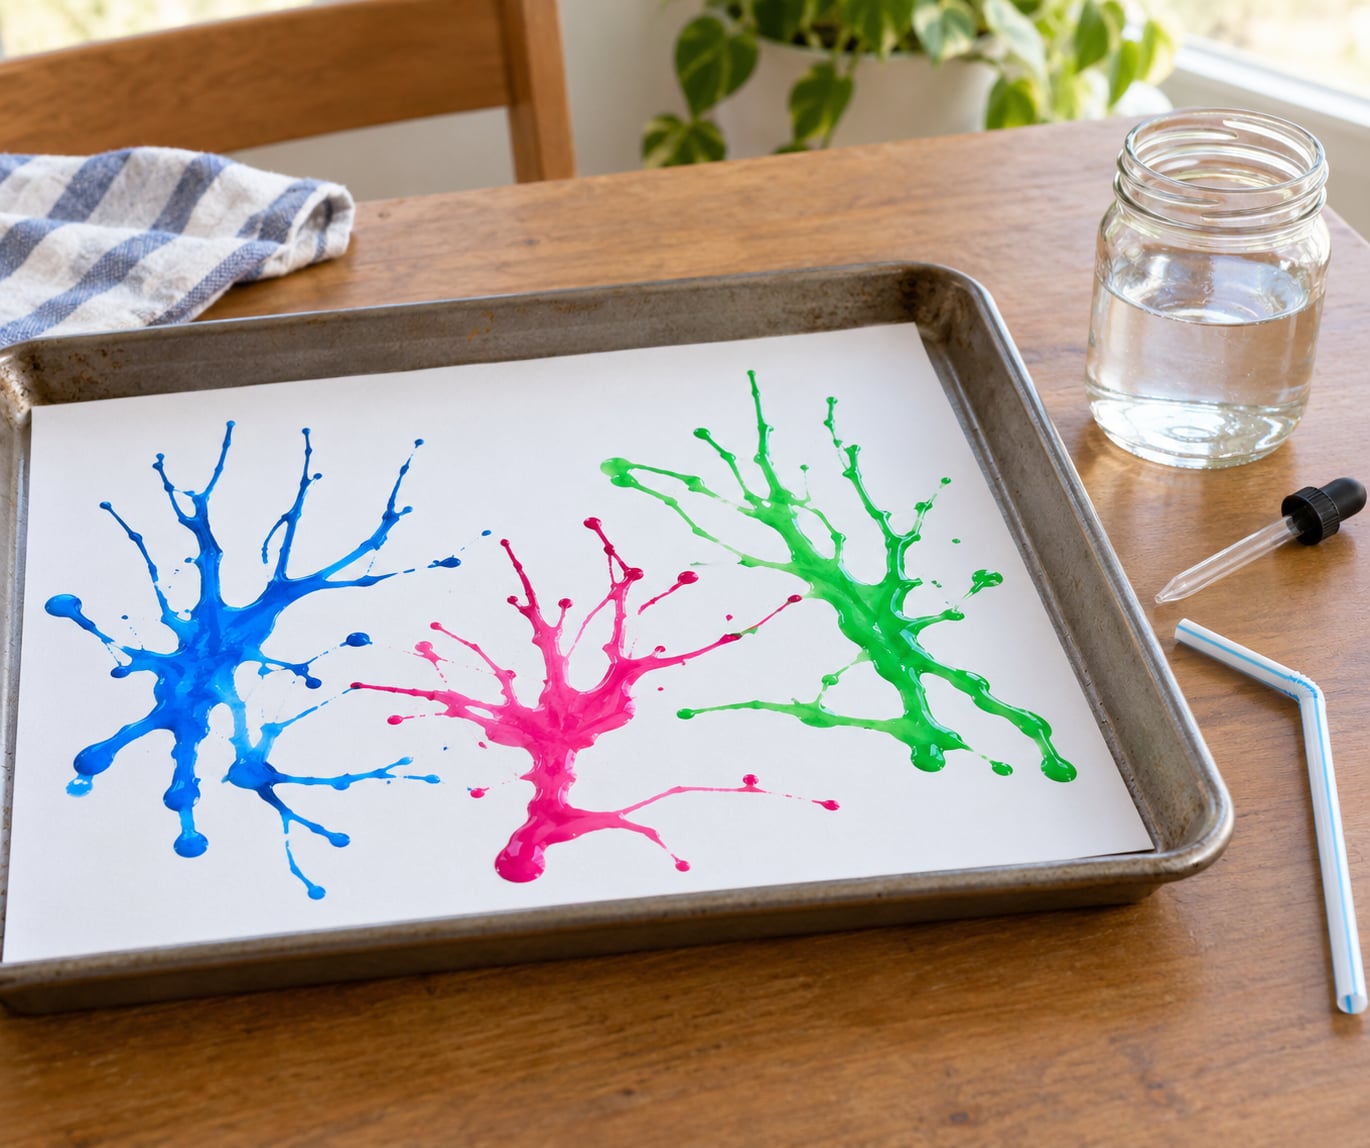
Blow painting is a process art activity where you drop small blobs of thin, runny paint onto paper and blow through a drinking straw to push the paint outwards into branching lines, splatters and one-of-a-kind shapes. If you have wondered how to do blow painting with straws, it takes about five minutes to set up and roughly ten minutes of blowing, and there is no wrong result to get wrong.
The catch is technique. Most disappointing first attempts come down to paint that is too thick, a straw held too close, or a child who blows like they are extinguishing a birthday candle. Get those three right and the rest follows.
Table of Contents
- What You Need
- How to do blow painting with straws without the mess
- Paper, cardstock or canvas: which surface works best
- How thin the paint needs to be
- Step-by-Step: How to Do Blow Painting with Straws
- Step 1: Prepare the Painting Surface
- Step 2: Add the Wet Paint
- Step 3: Blow the Paint
- Step 4: Create Shapes and Details
- Step 5: Let the Artwork Dry
- Common Mistakes and Easy Fixes
- Frequently Asked Questions
- What paint works best for blow painting with straws?
- How do I stop the paint blowing off the edge of the paper?
- Can toddlers do blow painting with straws?
- How do I stop the paper from buckling or curling?
- Why is my straw spluttering and the paint refusing to move?
- How do I clean and preserve the finished painting?
- Conclusion
What You Need
You need surprisingly little. One part of this list is essential and the rest just makes cleanup easier.
- Washable tempera or liquid watercolour paint. Two or three colours is plenty. Washable matters more than expensive here, because tempera is not a normal laundry-fibre stain.
- Water and a dropper or pipette for thinning the paint and placing drops.
- Cardstock, watercolour paper or canvas — anything heavier than printer paper.
- Drinking straws. Paper ones bend under pressure; bendable plastic straws or silicone straws hold a better angle.
- A shallow tray or a sheet of newspaper under the paper to catch the runaway paint.
- A small water jar and a rag for hands and the straw between colours.
Skipping the tray is the one thing I would not skip. Half the frustration parents describe is paint travelling past the paper edge and onto the table, and a tray turns that from a disaster into a non-event.
How to do blow painting with straws without the mess
Lay a sheet of newspaper or a plastic tablecloth on the table, put the paper on top, and tape down the corners. If your child is under four, put the whole thing inside a baking tray with a raised rim. I keep a rimmed tray permanently under the art supplies now; it is a two-minute fix that saves the table every time.
Rinse the straw in the water jar between colours. A straw carrying a film of dried yellow into the blue puddle is what turns a clean line brown.
Paper, cardstock or canvas: which surface works best
You will see conflicting advice online about this, so here is how the surfaces actually behave. The deciding factor is how fast the surface drinks the paint.
| Surface | How it behaves | Verdict |
|---|---|---|
| Printer paper | Buckles, tears and pills almost immediately when wet | Avoid |
| Watercolour paper | Absorbs fast, so the paint spreads into fine feathery veins | Good for soft, blendable effects |
| Cardstock | Absorbs slowly and holds the line, so the straw keeps pushing the paint | Best all-round choice |
| Canvas | Wicks paint into the weave but resists buckling; lines look bolder | Best for keepsake pieces |
| Foil or a laminated sheet | Non-absorbent, so paint pools and slides; wipe-clean | Best for repeat practice |
Cardstock is the safest default for a first try. The heavier the paper, the better, because thin paper warps while you are still working on it.
How thin the paint needs to be
Paint that runs is the goal. It should move on its own slowly before you even blow, which sounds wrong but is exactly right.
| Mix | What happens | Best for |
|---|---|---|
| Undiluted | Sits there; blowing moves a lump, not a line | Nothing in this technique |
| 1 part paint to 1 part water | Moves but keeps a defined branch at the tip | Trees, flowers, grass |
| 1 part paint to 2 parts water | Long thin tendrils and splatters | Monsters, tentacles, fireworks |
| 1 part paint to 3 parts water | Spreads wide and pale, like ink in water | Underwater scenes, galaxy backgrounds |
Add water a teaspoon at a time and stir. If the paint starts to look watery rather than runny, you have gone one step too far.
Step-by-Step: How to Do Blow Painting with Straws
| Step 1 | Cover the table and lay down your paper, secured flat. |
|---|---|
| Step 2 | Drop two or three small puddles of diluted paint on the paper, keeping them well apart. |
| Step 3 | Hold the straw a couple of inches above a puddle at a 45 degree angle and blow gently in one direction. |
| Step 4 | Work outward from the puddle, changing angle and height to grow branches, splatters and shapes. |
| Step 5 | Leave the paper flat and undisturbed until the paint is fully dry, usually several minutes up to an hour. |
Step 1: Prepare the Painting Surface
Cover the table first, then lay your paper on top and tape down the corners so it cannot slide. Decide now whether you are doing one colour or several, because a child who is given four puddles at once will mix them into mud within a minute. One colour until the technique clicks, then add more.
Diluted paint and heavier paper are what make this easy to control, which is why both sit in the supplies list rather than being optional.
Step 2: Add the Wet Paint
Place small puddles or fat dots of washable tempera or diluted acrylic paint with a dropper. About a quarter teaspoon per puddle is plenty, and a lid with a small hole cut in it turns the dropper into a steady nozzle for small hands.
Keep the puddles several inches apart at first so each child can blow an individual shape. Once they understand that the air pushes the paint away from the blob, they can drift two colours together deliberately and watch them blend at the meeting point.
Step 3: Blow the Paint
Put the straw a couple of inches above the paint, never touching it, and blow gently in one direction. A steady, soft breath gives long clean branches. Short stronger bursts throw the paint further and add splatters at the end of the lines.
You can see the three variables that control the result. Distance decides size: close gives small flowers and detail, far gives big soft shapes. Angle decides direction, and holding the straw lower and flatter sends paint sideways rather than off the page. Speed decides the edge: a fast breath splatters, a slow one draws.
You will know it worked when the puddle has emptied into branching tendrils and the paper around it is bare.
Step 4: Create Shapes and Details
Everything else is the same technique with a different start point. Blow downwards from a single green puddle for grass, up for a tree, outwards from a round blob for a flower, or in several directions from one central puddle for a spiderweb. Two or three colours placed in a triangle and blown toward the middle makes fireworks.
Add googly eyes, markers or small details only after the main lines are dry. Wet paint picks up whatever touches it, and a marker dragged through a damp branch turns to mud.
Step 5: Let the Artwork Dry
Leave the paper flat and undisturbed until the paint is dry, which takes several minutes for thin washes and closer to an hour for a thick layer on cardstock. Lifting it early is the main reason finished paintings end up smeared or stuck to the tray.
Once dry, lay it flat for another few minutes rather than stacking it, and it is ready to display.
Common Mistakes and Easy Fixes
Almost every disappointing blow painting has one of these six causes.
| What went wrong | Why | The fix |
|---|---|---|
| Paint blew off the paper | Straw held too low and too flat, or blown too hard | Lift the straw higher and point it away from the nearest edge |
| Nothing moves | Paint too thick | Add a teaspoon of water and stir, then test a drop on scrap paper |
| Straw splutters and spits | A blockage, or the child sucking instead of blowing | Rinse the straw, check the child is not lying over the paper, cut the end square |
| One big merged puddle | Too many colours placed too close together | One colour at a time, several inches apart, and let each dry |
| Colours turned muddy | Wet paint drifting into wet paint | Finish one colour fully before starting the next |
| Paper wrinkled or tore | Printer paper or over-wet application | Use cardstock and press drops on with a pipette instead of pouring |
Two habits fix most of these before they start. Have children blow with the paper flat on the table, not held up in the air, and have an adult within arm’s reach the whole time. A child lying over the work blows downwards onto their own painting, and a child with a straw in their mouth learns quickly that sucking brings the paint closer.
For toddlers, poke a small hole in the end of the straw with a pushpin. They can still blow air through it but cannot pull paint into their mouth, which is the single most repeated safety fix parents ask about. Choose certified non-toxic washable paint, and treat any paint that reaches a child’s mouth as a call to the poison control centre rather than a brush-it-off moment.
Frequently Asked Questions
What paint works best for blow painting with straws?
Liquid watercolour and washable tempera both work well because they thin easily with water. Tempera gives brighter, more opaque colour, and liquid watercolour gives softer, more blended marks. Skip heavy-bodied acrylic unless you dilute it, because it stays stiff and the straw will not move it. Any certified non-toxic washable paint is a safe choice for children.
How do I stop the paint blowing off the edge of the paper?
Lift the straw higher, usually two to three inches above the puddle, and hold it at a steeper angle so the air travels up the page rather than sideways. Place the puddle in the middle of the sheet and turn the paper instead of moving your arm in a big arc. A baking tray underneath catches anything that still escapes.
Can toddlers do blow painting with straws?
Yes, from around two years old with an adult sitting close by, but expect a blob rather than branches at first because sustained breath control takes years to develop. Thin the paint more than you think you need, poke a small hole in the straw end so they cannot suck paint, and keep the sheet small. Many toddlers prefer to spit-blow across the puddle, which works just as well.
How do I stop the paper from buckling or curling?
Use cardstock or watercolour paper rather than printer paper, and tape the corners down while you work so the sheet cannot lift. Apply paint as drops with a dropper or pipette instead of pouring or brushing it on, and work on a flat surface rather than holding the paper. Most buckling comes from thin paper plus too much water, not from the blowing.
Why is my straw spluttering and the paint refusing to move?
That usually means the straw is partly blocked or the child is sucking instead of blowing, which pulls air backwards and spits paint. Cut the end of the straw square, rinse it in clean water, and have the child blow with their head above the paper rather than lying over it. If the paint still will not move, it is too thick, so add water a teaspoon at a time.
How do I clean and preserve the finished painting?
Once the paint is fully dry, most washable tempera comes off cardboard and cardstock with a barely damp cloth, though it is easier to leave it. Do not scrub, as the paint has already soaked into the fibres. Keep the artwork flat, out of direct sunlight, and away from damp storage if you want the colours to stay true for years.
Conclusion
The easiest first attempt is diluted washable paint at roughly one part paint to one part water, cardstock taped to a tray, and one small puddle blown from a couple of inches away. Get that single line right and the child will do the rest themselves.
Once they can control the blow, add a second colour, then start naming what they are making. Monsters, trees, flowers, underwater scenes and galaxy backgrounds all come from the same handful of puddles. If you have been wondering how to do blow painting with straws that actually looks like something, begin with one colour and let the technique build from there.