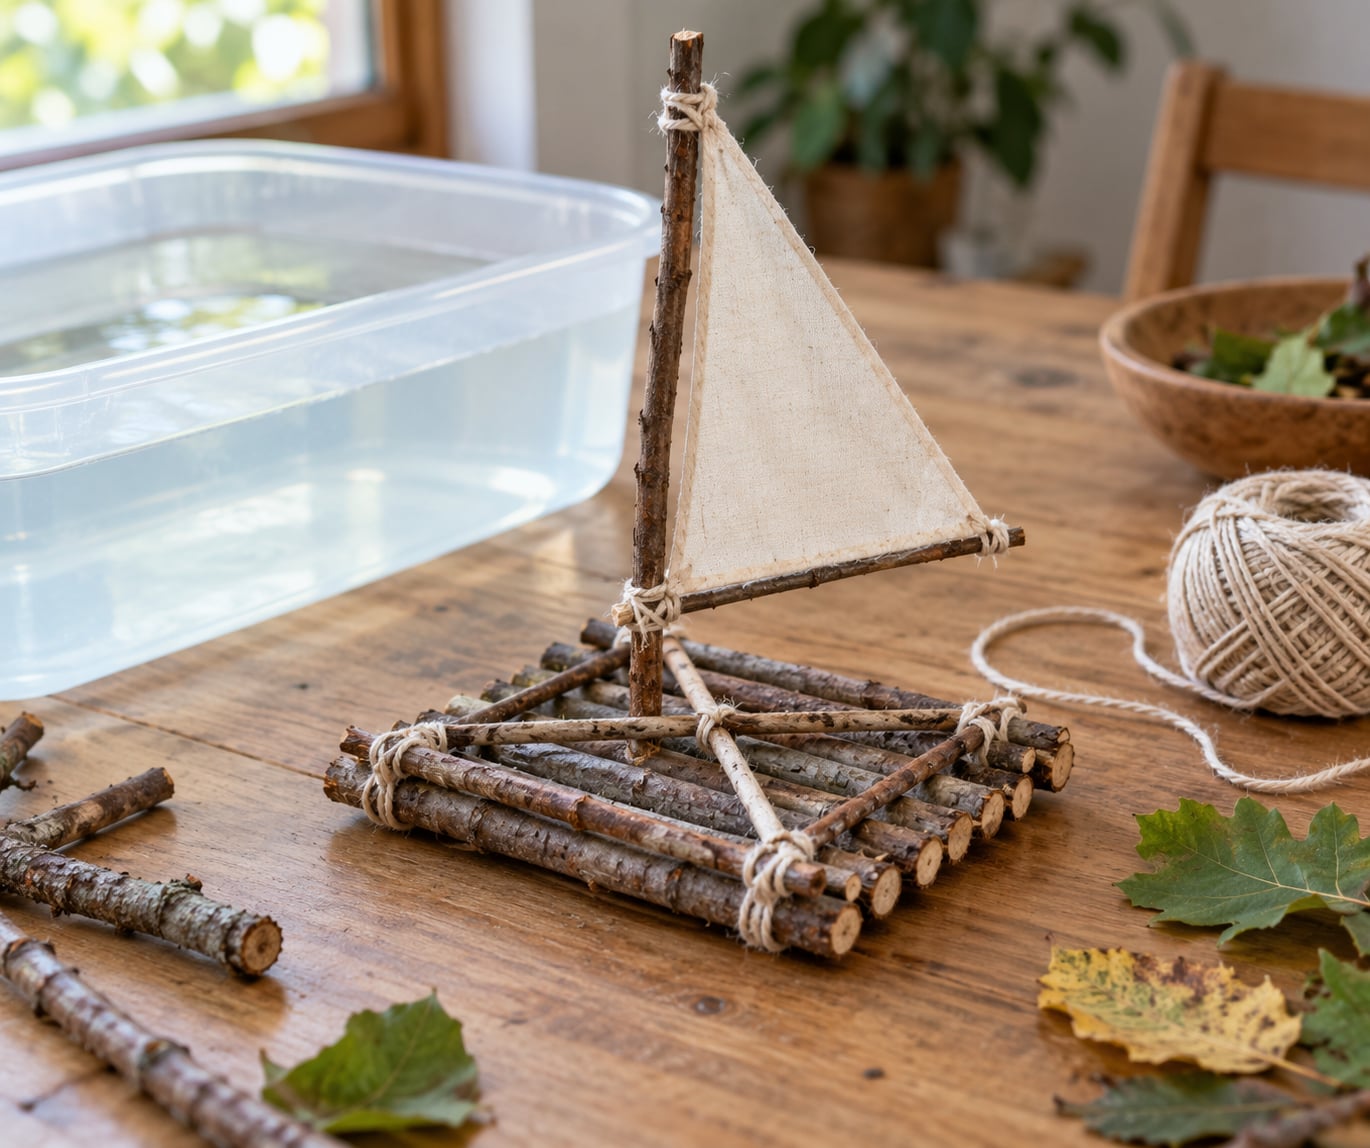
A stick raft is a small floating boat built by laying a row of straight sticks across two cross braces and binding them together, and the whole build takes about 20 minutes. Here is how to make a stick raft with kids using dry sticks, a short length of twine and whatever craft scraps you already have in a drawer.
The kids can take over most of it. Laying sticks, wrapping twine and picking the decorations are the fun parts, and once it hits water the play usually outlasts the craft.
Table of Contents
- What You Need
- Step-by-Step: How to Make a Stick Raft with Kids
- How to Make a Stick Raft with Kids: Build the Base
- Add a Mast and Simple Sail
- Decorate the Raft
- Test the Raft Safely in Shallow Water
- Common Mistakes
- Frequently Asked Questions
- What materials are best for making a stick raft with kids?
- What age is appropriate for building a stick raft?
- How do you keep a stick raft from falling apart?
- Can you make a stick raft without twine?
- How do you test whether a stick raft floats?
- Can children decorate the raft with paint or leaves?
- Conclusion
What You Need
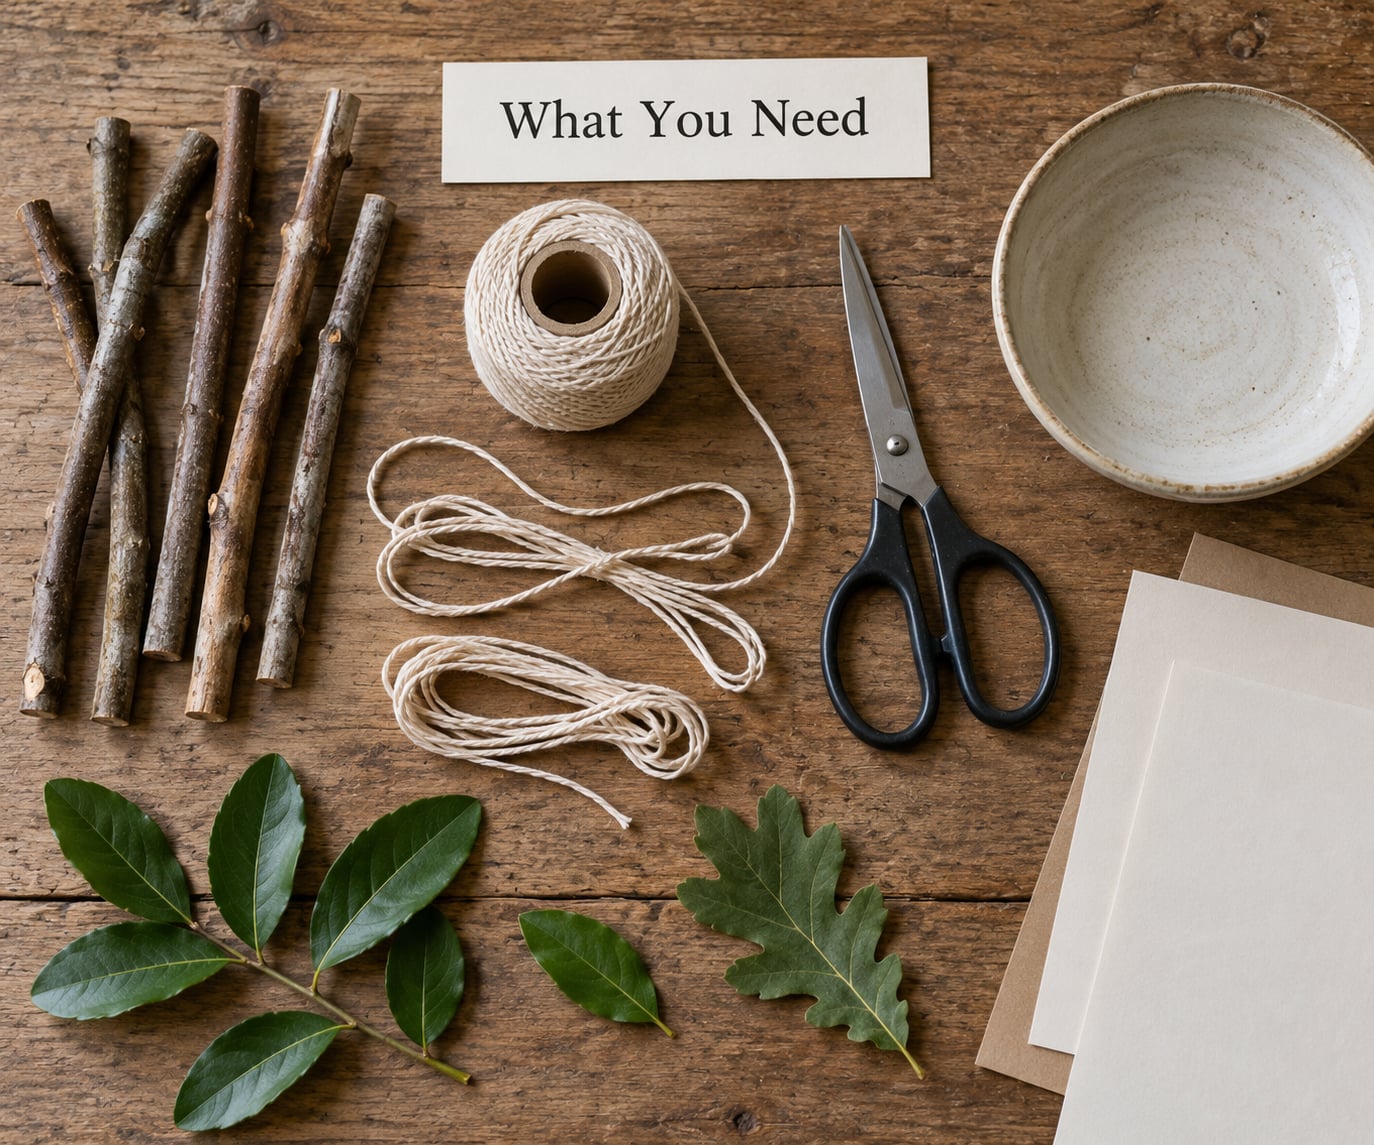
Gather everything on one tray before anyone starts tying anything. Having the parts ready is the difference between a calm twenty-minute build and a negotiation.
| Item | Quantity | Free household swap |
|---|---|---|
| Long straight sticks | 2 | Two forked branches, or craft sticks taped end to end |
| Short straight sticks | 8 to 10 | Ice pop sticks, tongue depressor-size craft sticks, twigs |
| Cotton twine | About 1.5 metres | String, ribbon, or elastic bands for small hands |
| Scissors | 1 pair | A blunt nail file works for snipping twine ends |
| Paper or fabric | 1 square | A cut plastic lid or jug panel for a waterproof sail |
| Decorations | A handful | Leaves, bottle caps, corks, yarn offcuts |
| Shallow tub | 1 | Baking dish, a clean sink or the bathtub |
| Binder clip or clothespin | 1 | A small blob of blue tack or reusable putty |
One material warning matters more than everything else on this list. Dry sticks float, freshly cut green sticks sink, so gather wood that has been off a tree for at least a few days and let it sit indoors overnight if you can.
What each age can realistically take on:
| Age | What they do | What an adult handles |
|---|---|---|
| 2 to 3 | Collect sticks, choose decorations, poke stickers on | Every cut, tie and water test |
| 4 to 5 | Lay the sticks in order, wrap twine around a brace with an adult’s help | Finishing the knots and the water test |
| 6 and up | Build the whole thing, including the knots and the mast | Sharp tools and any water deeper than ankle depth |
Step-by-Step: How to Make a Stick Raft with Kids
The build runs in four stages: make a flat cross-braced deck, stand up a mast with a sail, let the kids decorate it, then float-test it under an adult’s watch. Each stage has a quick check so you know it worked before moving on.
How to Make a Stick Raft with Kids: Build the Base
- Lay the deck. Set 6 to 7 short sticks side by side in a row, roughly the same length, with the thin ones nearest the middle. Success check: the row sits flat on the table and the ends are close to level.
- Add the cross braces. Lay one long stick across the deck near each end, about a thumb’s width in from the tips. Success check: the deck now holds together when you press the middle gently.
- Bind every joint. Wrap twine around a brace and over the deck sticks, then under and back to the next stick, and tie a simple knot. Repeat at each end of each brace. Snug beats tight, because tight twine bites into wood and weakens it.
Older kids can add a third brace or a diagonal stick across the deck to stop it twisting, which is where a clove hitch or a lashing pattern starts to earn its keep.
Success check for the whole base: lift it by one corner and give it a shake. If nothing shifts or creaks, it is ready for a mast.
Add a Mast and Simple Sail
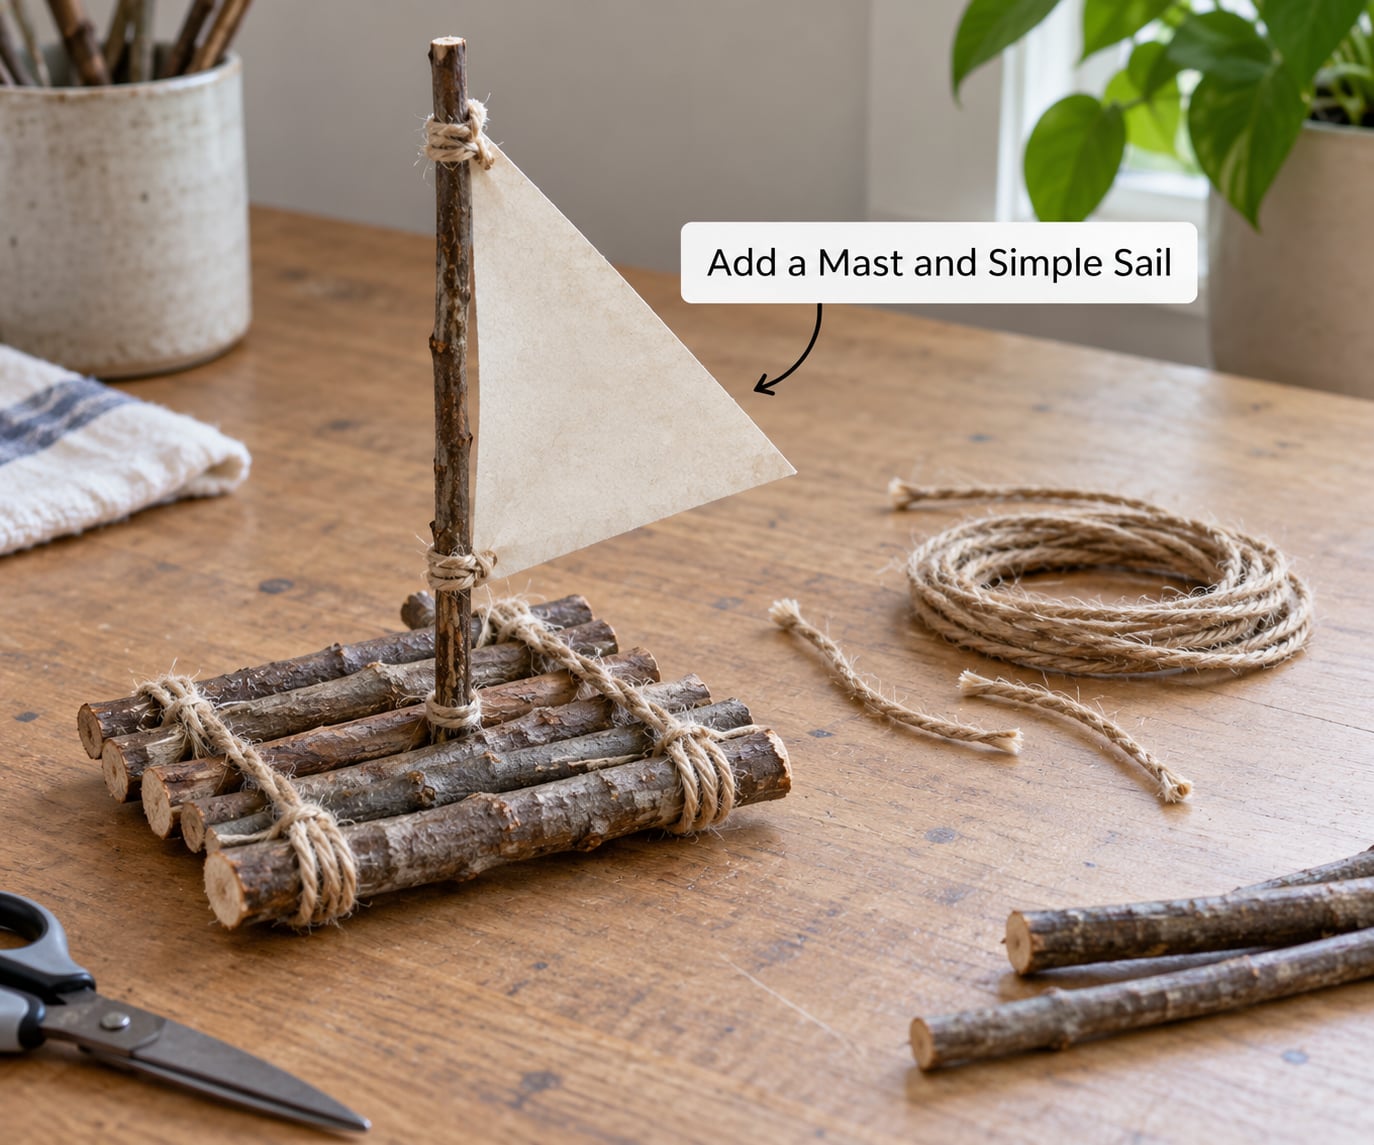
- Stand the mast. Lash a straight twig upright to one cross brace, and run two short pieces of twine from the mast’s midpoint down to the opposite corners of the deck.
- Add the sail. Cut a triangle from paper, thin fabric or a large leaf, then fasten it to the mast with twine or a tiny blob of blue tack.
Success check: let go of the mast and it should stand on its own for a few seconds. If it falls, add a guy line rather than tightening the base, since a rigid mast transfers every wave straight into the frame.
Paper sails go soggy fast, and a soggy sail drags one side down until the raft tips. A triangle cut from a plastic lid or a cleaned jug panel holds its shape all afternoon.
Decorate the Raft
- Personalise it. Crayons and washable paint on the deck sticks, yarn tied around the braces, leaves or small collected twigs on the deck, and a name on the sail.
Paint the sticks before assembly whenever you can. Once a raft is lashed, there is very little room to reach between the sticks without undoing the twine.
Keep decorations light. Anything that adds a lot of weight to one corner is the fastest way to a raft that floats on one side, and corks or plastic bottle caps under the deck add buoyancy without weighing it down.
Test the Raft Safely in Shallow Water
- Float-test it. Set the raft on the water gently, let go, and watch which way it settles before you push it anywhere.
- Add load a piece at a time. Have your child predict how many bottle caps or coins the deck holds, then count them onto the middle and record the number.
For a first test, a baking dish on the kitchen table beats a paddling pool. A bathtub works well too, and a shallow stream is the best of all if you are already out on a walk.
- Stay within arm’s reach and keep the water shallower than the child’s knee.
- Tie a length of twine to the mast with a loop at the end so the child can wear it on their wrist. Rafts drift away, and a wrist loop ends the second raft of the afternoon.
- Check that nothing on the raft is sharp enough to poke, and skip water entirely if anyone has a plaster cast or an open cut.
- Have a net, a large spoon or a flat spatula within reach so you can lift the raft out without hooking the deck.
Common Mistakes
The joints snap apart the moment it touches water. The lashing was probably too loose, or the braces sat too far out from the tips. Move both braces inward so they sit over the deck sticks, wrap the twine twice per stick, and pull it snug until the sticks stop shifting.
The raft tips or sinks. Nine times out of ten the sticks were green, or the deck is loaded to one side. Dry wood, an even spread of weight and a wide base fix it.
The sticks are too big to float. A raft built from thick branches displaces less water per gram than one built from slim sticks. Swap anything thicker than a pencil for thinner sticks and the deck gets lighter as it goes.
The twine is a mess and knots keep slipping. Cut it to the length you need before you start, and use elastic bands instead if your child finds knots frustrating. Little blobs of blue tack or reusable putty hold sticks together well enough for a short float.
The mast wobbles or topples. Tall masts act like sails above the waterline. Shorten the mast, add a guy line to the far corner, or leave it off entirely and let the raft be a raft rather than a ship.
The sail drags and the raft rolls over. Wet paper and fabric get heavy. Replace the sail with plastic, make it smaller, or attach it to one side only so it can swing with the movement instead of fighting it.
The raft is tested in water that is too deep or too busy. Move the whole test to a tub, a shallow paddling pool or a calm edge of a stream. Nothing about this craft needs deep water, and the learning happens just as well in six inches of water.
Frequently Asked Questions
What materials are best for making a stick raft with kids?
Dry, slim sticks work best, so gather twigs or branches that have dried for a few days rather than anything freshly cut from a tree. You also need two longer sticks to lay across the deck as braces, plus twine, string or elastic bands to bind the joints. Paper, fabric or a cut piece of plastic makes a sail, and a shallow tub, sink or bathtub handles the float test.
What age is appropriate for building a stick raft?
Ages four and up can lay the sticks, wrap twine around a brace and decorate the raft with a little help at the knots. Two and three year olds join in by collecting materials, choosing decorations and pressing glued pieces on while an adult handles every sharp tool and knot. Children six and older can build independently and try knots such as a clove hitch.
How do you keep a stick raft from falling apart?
Bind every joint twice and pull the twine snug rather than tight, because over-tight twine cuts into wood and weakens it. Place both cross braces a thumb’s width in from the ends of the deck so there are enough sticks under each one, and add a diagonal brace across the deck if you want extra stiffness. Test the frame by lifting and shaking it before it ever touches water.
Can you make a stick raft without twine?
Yes. Elastic bands stretch around thicker sticks and are much easier for small hands, and a binder clip or a clothespin can hold a lashing point together. Small blobs of blue tack or reusable putty also work well for holding sticks in place. If you have neither, build the deck from sticks taped end to end underneath, or lay two crossed craft sticks on top as braces.
How do you test whether a stick raft floats?
Set the raft on the water gently rather than dropping it, then let go and watch which way it settles before you push it. A good raft sits level with water lapping the underside of the deck. For a STEM twist, have your child predict how many coins or bottle caps the middle will hold, then add them one at a time and record the number before the deck touches the water.
Can children decorate the raft with paint or leaves?
Yes, and decorating is usually the part children care about most. Crayons, washable paint, yarn tied around the braces, and leaves or small collected twigs on the deck all work. Paint the sticks before you bind the raft together, since there is very little room to reach between them afterwards. Keep decorations light and spread evenly so the raft does not float lopsided.
Conclusion
Start by putting a handful of dry sticks and a length of twine on the table, then let your child lay out the deck in whatever order they like. The building is only half of it, and the decorating and the float test are where the afternoon gets remembered.
Give it a name, set it loose in a tub or a shallow stream with an adult close by, and see how long it stays afloat before it soaks through.