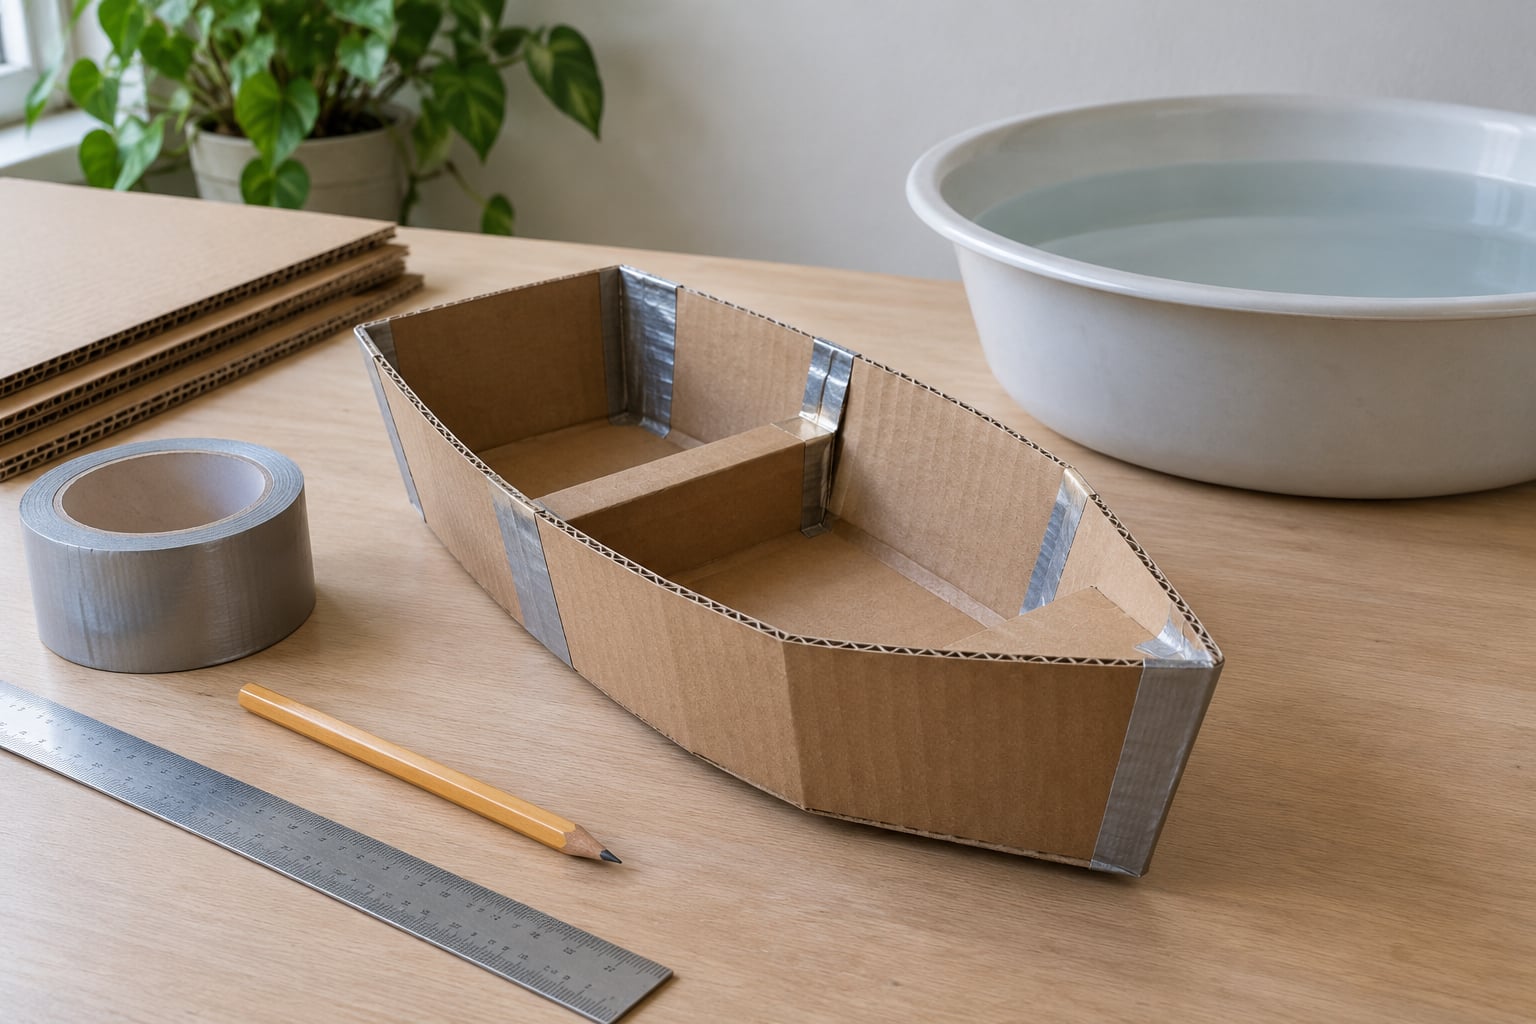
A cardboard boat floats when its sealed hull is wide and flat enough to push aside a weight of water greater than the weight of the boat itself. To make one, cut two matching side panels from corrugated box cardboard, shape the same pointed bow and stern on both, join them to a flat base, and seal every raw edge and seam so the flutes inside the cardboard cannot drink up water.
The whole build takes about an hour and needs materials you probably already have in a closet. It is a good rainy-afternoon project for kids roughly five and up, with an adult doing the cutting.
I will say up front what the craft guides skip: the first boat usually sinks. Not because the idea is wrong, but because the seams leak and the first attempt is rarely symmetrical. Testing a small hull before you decorate anything is the whole trick.
Table of Contents
- What You Need
- How to Make a Cardboard Boat That Floats
- Step 1: Cut and Shape the Cardboard Hull
- Step 2: Add the Bottom and Secure the Sides
- Step 3: Add a Mast, Flag or Other Details
- Step 4: Test the Boat and Fix Balance Problems
- Common Mistakes
- Frequently Asked Questions
- What kind of cardboard is best for a boat that floats?
- How do you waterproof a cardboard boat so it does not fall apart?
- How much weight can a cardboard boat hold?
- Can I reuse a cardboard boat or make a bigger one for a group?
- Conclusion: Start With a Small Test Boat
What You Need
Start by looking at what you can source before buying anything. Appliance boxes, shipping boxes from online orders, and the big flat boxes grocery stores set aside for recycling are all fair game, and the corrugation in those is usually the double-wall stuff you want.
- Double-wall corrugated cardboard. Two boxes with a shipping box cut open and flattened. Single-wall cereal-box cardboard will not survive the test, and triple-wall is heavier than a small hull needs.
- Waterproof duct tape. Silver duct tape works. Clear packing tape holds a seam but gives up first in water.
- A utility knife or craft knife, plus a metal ruler. Children should not use the knife unsupervised. An adult should do all cutting, or pre-cut the panels before handing the project over.
- A pencil and marker. For marking the outline and the waterline, and for decorating later.
- A ruler or tape measure. Symmetry depends on measurement, not eyeballing.
- Paint or washable markers. Optional, and check your event rules first because many regattas ban anything but cardboard and tape.
- A shallow tub, basin or bathtub. Somewhere to test that stays in the tub when you drop it.
A towel under the work area saves cleanup, and it keeps the damp cardboard off your floor. Recycled cardboard is not spotless, so expect a little washing.
How to Make a Cardboard Boat That Floats
The method below builds a tub-shaped hull rather than a folded paper boat, because a flat-bottomed hull carries more weight for the same amount of cardboard. Treat the measurements as starting points and adapt them to the boxes you have.
Step 1: Cut and Shape the Cardboard Hull
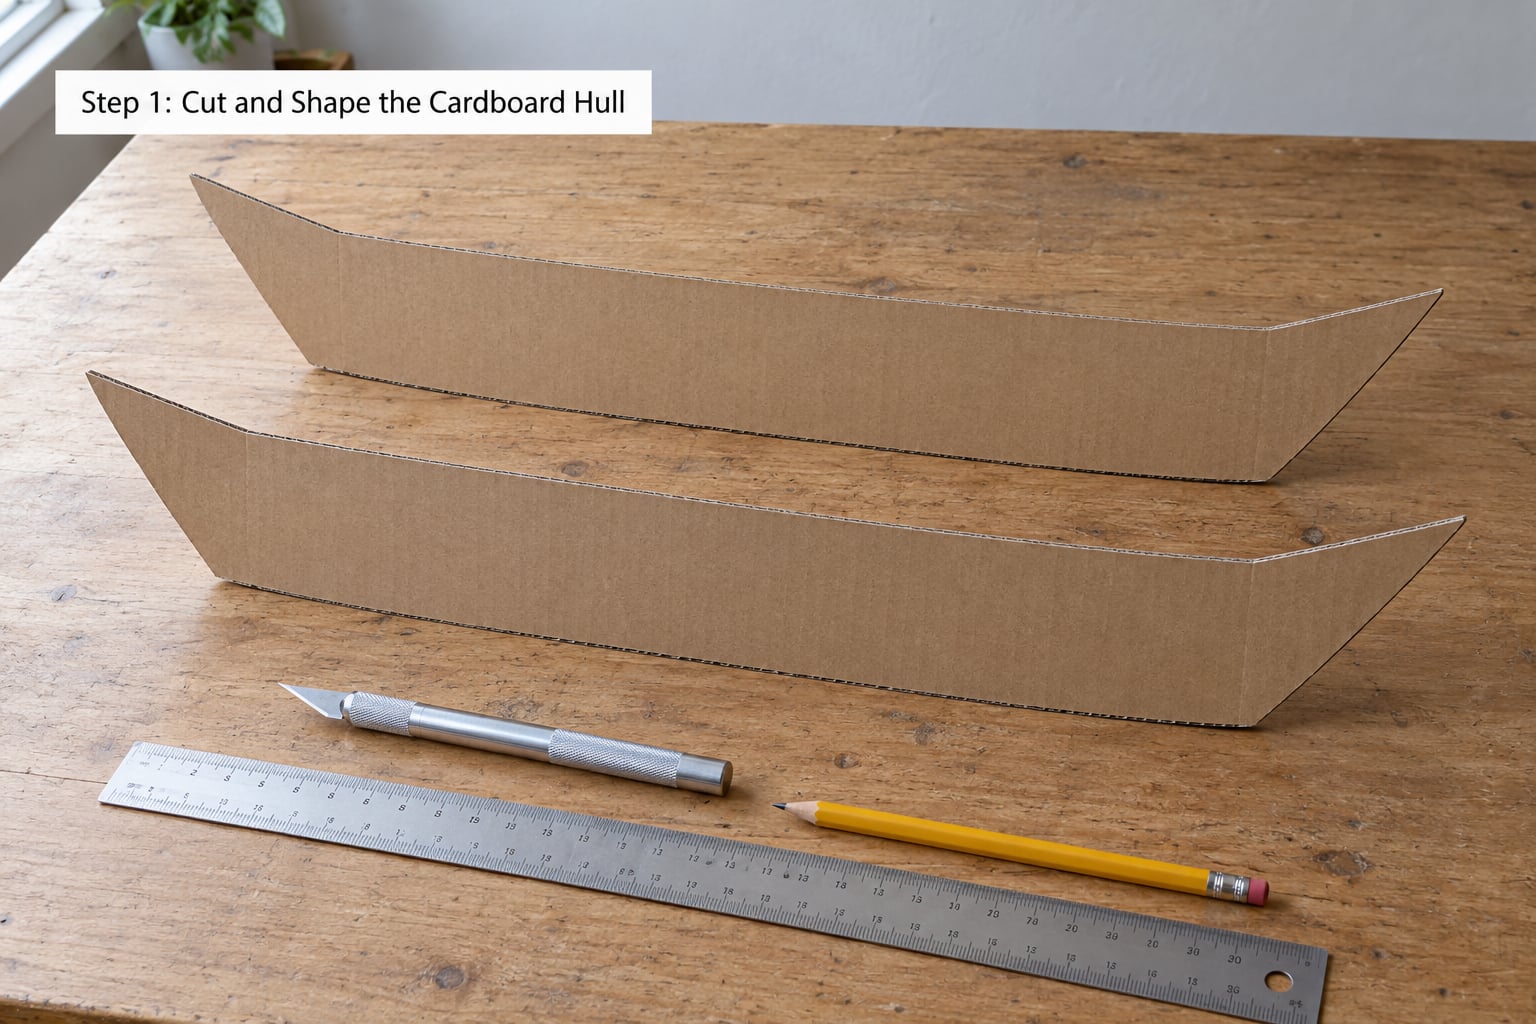
Lay a flattened box on the table and mark a long side panel. A panel about 24 inches long and 8 inches tall is a workable toy-sized hull. Add a pointed bow at one end and a matching pointed stern at the other, then cut the first panel out with the knife against the ruler.
Flip the cardboard over, lay the finished panel on it, trace around it, and cut the second panel. Tracing the first one guarantees the two sides match, which is the single biggest reason a homemade hull floats level instead of leaning.
To strengthen the panels further, glue or tape a second sheet on the back with the corrugation running at right angles to the first. Cardboard is strongest across its flutes, so rotating the second layer ninety degrees gives you a laminate that bends far less than two layers stacked the same way.
Step 2: Add the Bottom and Secure the Sides
Cut a third panel for the floor, the same length as the hull and roughly as wide as the distance between your two side panels at the widest point. Sand or trim the corners of that floor piece so it sits flat instead of forcing the sides apart.
Stand the two side panels up and set the floor between them, with its top edge level with the bottom edges of the sides. Tape the floor to the inside of each side panel first, running the tape along the seam on the inside. Then bring the two sides together, check the boat still looks symmetrical from the front, and tape the outside seam.
Seal the inside of every seam as carefully as the outside. Water that gets past the outer tape and soaks into the corrugated core adds weight that never comes back out, and that is how a boat that floated fine yesterday sits at the bottom of the tub today.
Do not wrap the entire hull in one continuous sheet of tape. A solid outer layer seals the outside but traps whatever moisture is already inside against the cardboard, and a taped skin feels waterproof right up until the first soak. Small overlapping patches, sealed raw edges, and a lined interior work better.
For the raw flute edges at the bow and stern, builders on regatta forums report sealing them with caulk and paint, and that method holds up well. Where you need to stay within a cardboard-and-tape-only rule, run extra tape strips over each raw edge instead, folding them down onto both faces.
Step 3: Add a Mast, Flag or Other Details
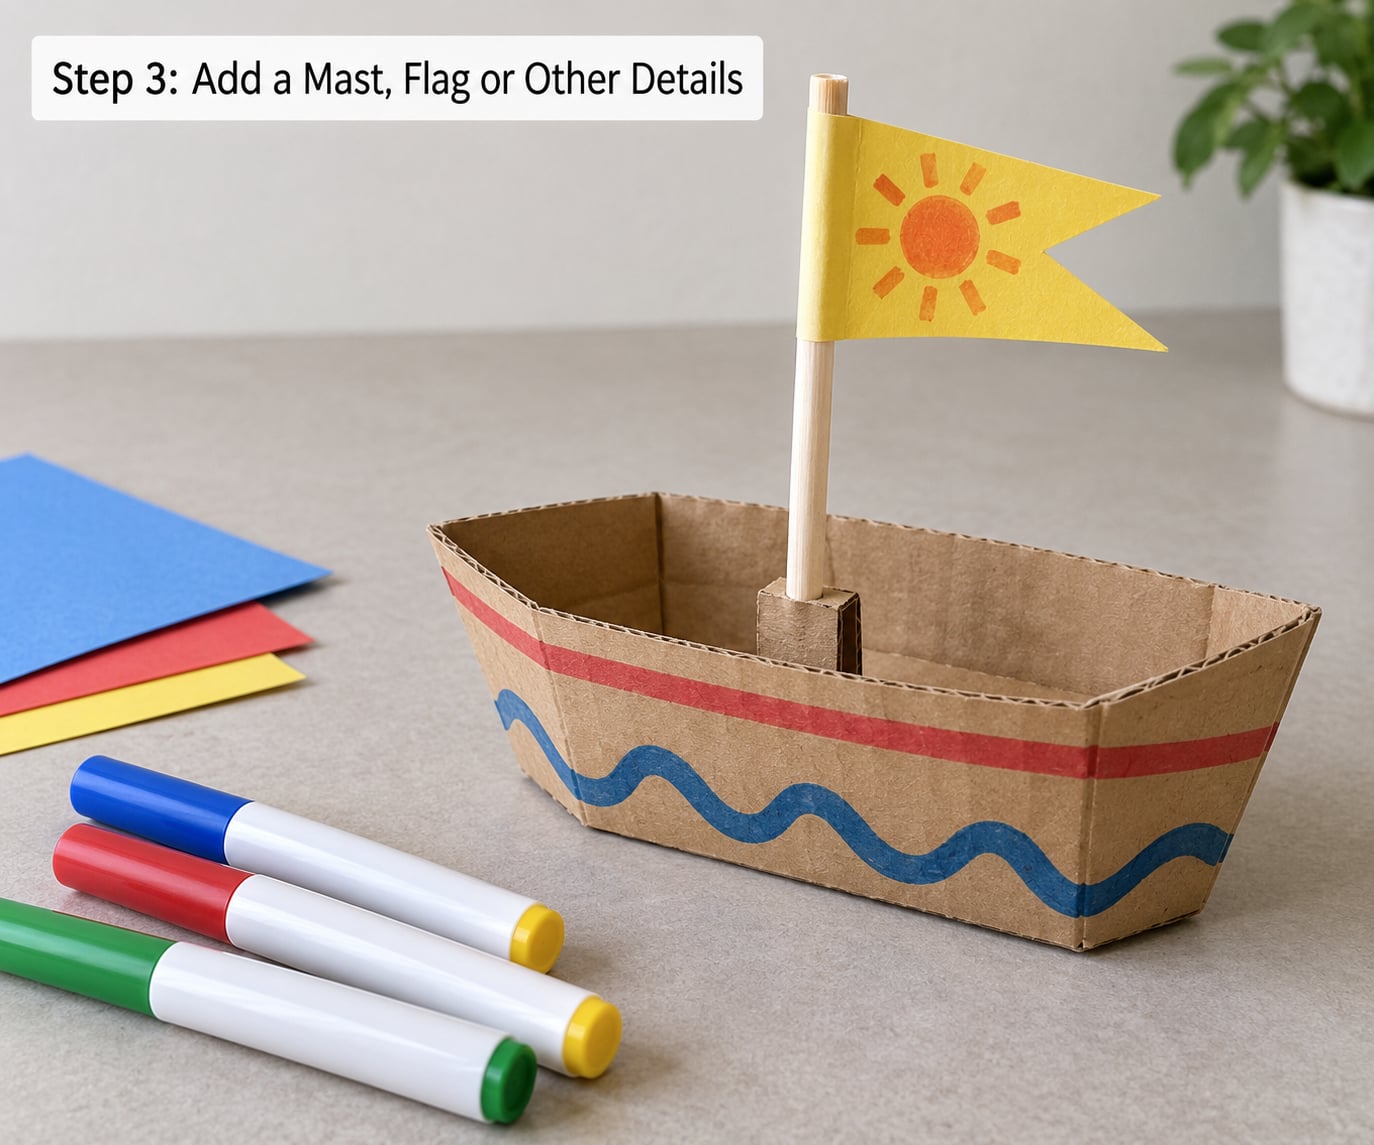
Decorating comes after sealing, not before, so paint and glue do not sit under a seam. Markers and washable paint work best on the dry outer skin. A paper straw or a thin cardboard tube makes a mast, and a triangle cut from paper or a leftover wrapper makes a flag.
Keep everything light. A tall mast, a glued-on cardboard cabin or a jar of pennies all push the center of gravity up, and a boat with a high center of gravity capsizes rather than sinks, which is more disappointing when it happens in front of other families at the pond.
For a keel, slide a cardboard tube from a toilet paper roll or a mailing roll along the outside bottom. For extra float in a large build, empty plastic bottles lashed along the sides add buoyancy, though most events ban them, so check first.
Step 4: Test the Boat and Fix Balance Problems
Set the hull in a shallow tub where you can still see the bottom if it goes under. A boat with a broad base usually settles about a third of its side height into the water. Float there, level and unbothered, and you have a working hull.
Then load test it. Have your child add coins one at a time to the middle of the floor, not the edge, and count them until the rim touches the water. Write the number down, then compare designs. Most toy-sized cardboard hulls manage a small handful of coins; anything beyond that means a wider floor or a taller wall, not more tape.
If it leans to one side, a side panel is off by a fraction of an inch, so trim the fat edge or shim the thin one. If the floor bows under the load, add a cross-rib of cardboard under the middle where the weight sits, which is the most common structural failure in a home-built hull. If the seams weep, dry the boat fully overnight and re-tape them from the inside.
Repeat each test with the boat empty, then loaded. A design that only works empty is a decoration, not a boat.
Common Mistakes
Most first boats sink for one of four reasons, and each has a straightforward fix.
- Sealing only the outside. Water wicks into the corrugation and the hull gets heavier by the minute. Tape the interior seams too, and cap the raw ends at bow and stern.
- Mismatched side panels. Trace the first panel for the second instead of cutting both by eye, and check the boat from the front before taping it shut.
- A narrow bottom. A slim keel looks elegant and displaces almost nothing. A flat, wide base carries more weight for the same cardboard, which is why so many winning regatta hulls look like tubs.
- Too much weight above the waterline. Tall sides filled with cargo capsize a boat that would otherwise float fine. Heavy things belong low and in the middle.
If you want to push further, build two or three small hulls the same way and change one variable each time: a wider base, taller walls, more layers of cardboard. Recording which one carries the most coins is a proper little engineering project, and it takes an afternoon.
Frequently Asked Questions
What kind of cardboard is best for a boat that floats?
Double-wall corrugated cardboard is the sweet spot for most home builds. Single-wall cereal-box board soaks through in minutes and has almost no stiffness, while triple-wall is strong but heavy enough to make a small hull sit too deep in the water. If you can only find single-wall, sandwich two sheets with the flutes running at right angles and tape them well before you cut the hull.
How do you waterproof a cardboard boat so it does not fall apart?
Seal the inside seams first, then the outside, then cap every raw flute edge at the bow, stern and floor joins. Use overlapping patches of tape rather than one continuous sheet wrapped around the whole hull, which traps water against the cardboard core. Where you can, add a plastic bag or wrap liner inside the hull as a second membrane.
How much weight can a cardboard boat hold?
A toy-sized hull with a double-layer floor usually carries a small handful of coins before the rim reaches the waterline. Adding height to the walls or widening the flat base raises that figure more than any amount of extra taping. Test your own boat rather than trusting a number, since panel size and layer count change everything.
Can I reuse a cardboard boat or make a bigger one for a group?
You can, with care. A soaked hull will not recover, so dry it fully before storing it and expect the cardboard to stay a little soft. For a bigger build, scale every panel proportionally, double the floor, add cross-ribs under the seating area, and check your event rules first, since many regattas allow only cardboard and duct tape and ban paint, glue and plastic bottles.
Conclusion: Start With a Small Test Boat
Cut one small symmetrical hull, seal the inside seams, and float it in shallow water before you add anything else. That single test tells you more than an hour of decorating ever will.
Once the empty boat sits level, load it with coins and start changing one variable at a time. The wide base, the sealed seams and the layered cardboard are usually the difference between a boat that sinks and one that glides across a pond.