The easiest yarn crafts for kids beginners are the ones that wrap, wind, weave, or glue instead of knit. A torn-paper yarn collage, a pom-pom creature, and a yarn-wrapped letter will keep a brand-new crafter happily busy for about fifteen minutes each, with no needle, no hook, and no pattern to follow.
That matters because most young kids abandon a fiber project long before an adult would. They get tangled yarn, dropped loops, and a duller face than the one they started with. Wrapping and gluing gives them the same satisfying, tactile payoff without the frustration.
Every project below needs the same short supply list: yarn, a glue stick, cardboard or a paper plate, and scissors. Most finish inside a single sitting, which lines up nicely with a quiet hour at the end of the afternoon.
Table of Contents
- Yarn Crafts for Kids Beginners at a Glance
- 1. Paper yarn collage
- 2. Simple yarn-wrapped cardboard letters
- 3. Paper plate yarn bowl
- 4. Pom-pom creature
- Yarn crafts for kids beginners: skipping the needle entirely
- 5. Yarn snake or worm
- 6. Yarn-wrapped tin pencil holder
- 7. Cardboard loom weaving
- 8. Yarn sun catcher
- 9. Yarn bookmark
- 10. Yarn picture frame
- Frequently Asked Questions
- What type of yarn is easiest for kids to use?
- How can I help a young child use yarn safely?
- Can I make these crafts without buying special supplies?
- What glue works best for yarn crafts with cardboard?
- How do I keep yarn from tangling while children work?
- Which yarn craft is best for a complete beginner?
- Where to Start
Yarn Crafts for Kids Beginners at a Glance
Here is the short version. Start with the paper plate bowl or the wrapped letter if your child has never held a skein before; move up to the loom and the bookmark when they want a project that lasts longer than one nap window.
| Project | Main materials | Best age | Time | Skill it practices |
|---|---|---|---|---|
| Paper yarn collage | Colored paper, cardboard, glue stick | 3-5 | 10-15 min | Pincer grip, tearing, placement |
| Yarn-wrapped letters | Cardboard, yarn, glue stick | 4-7 | 15-20 min | Letter recognition, steady wrapping |
| Paper plate yarn bowl | Paper plate, yarn, paint or marker | 4-7 | 15 min | Concentration, circular winding |
| Pom-pom creature | Yarn, cardboard strips, glue, paper | 5-8 | 15-20 min | Winding tension, cutting loops |
| Yarn snake | Yarn, paper tube, felt or paper | 4-8 | 10 min | Braiding, fine motor control |
| Yarn-wrapped tin holder | Small tin, yarn, glue stick | 6-9 | 20 min | Pacing, surface coverage |
| Cardboard loom weaving | Cardboard, yarn, blunt tapestry needle | 6-10 | 20-30 min | Over-under weaving, hand-eye coordination |
| Yarn sun catcher | Cardboard ring, yarn, tissue paper | 4-7 | 20 min | Patterning, light play |
| Yarn bookmark | Cardstock, yarn, needle, tape | 7-10 | 20 min | Straight and wrapped stitching |
| Yarn picture frame | Cardboard, yarn, small found items | 5-10 | 25 min | Design planning, decoration decisions |
1. Paper yarn collage
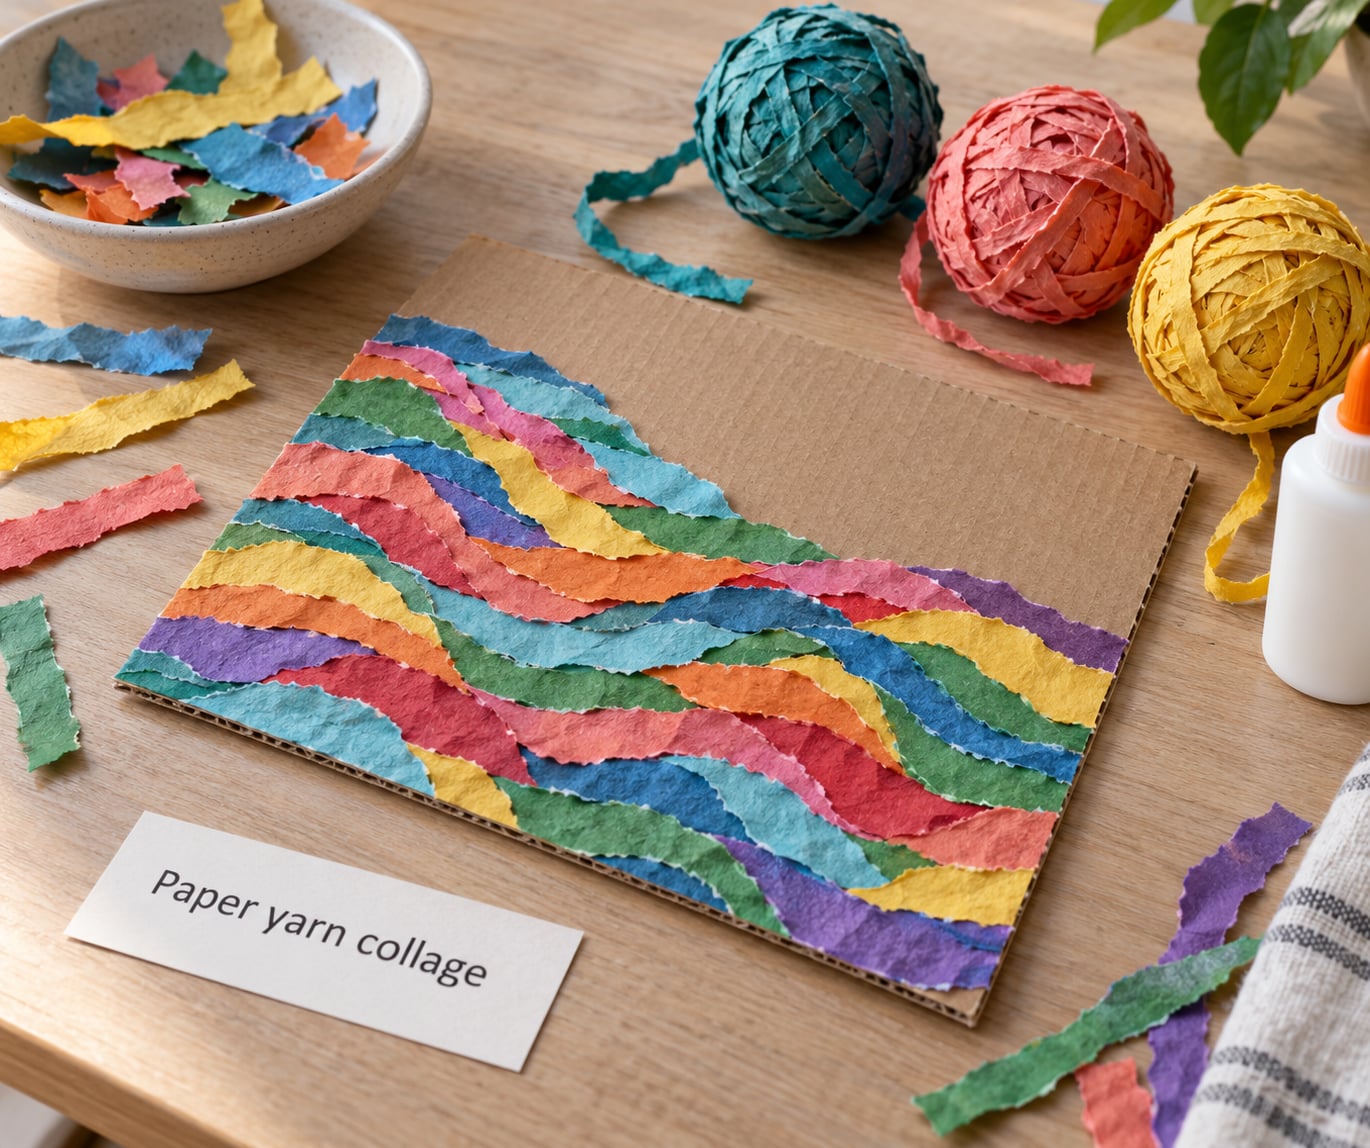
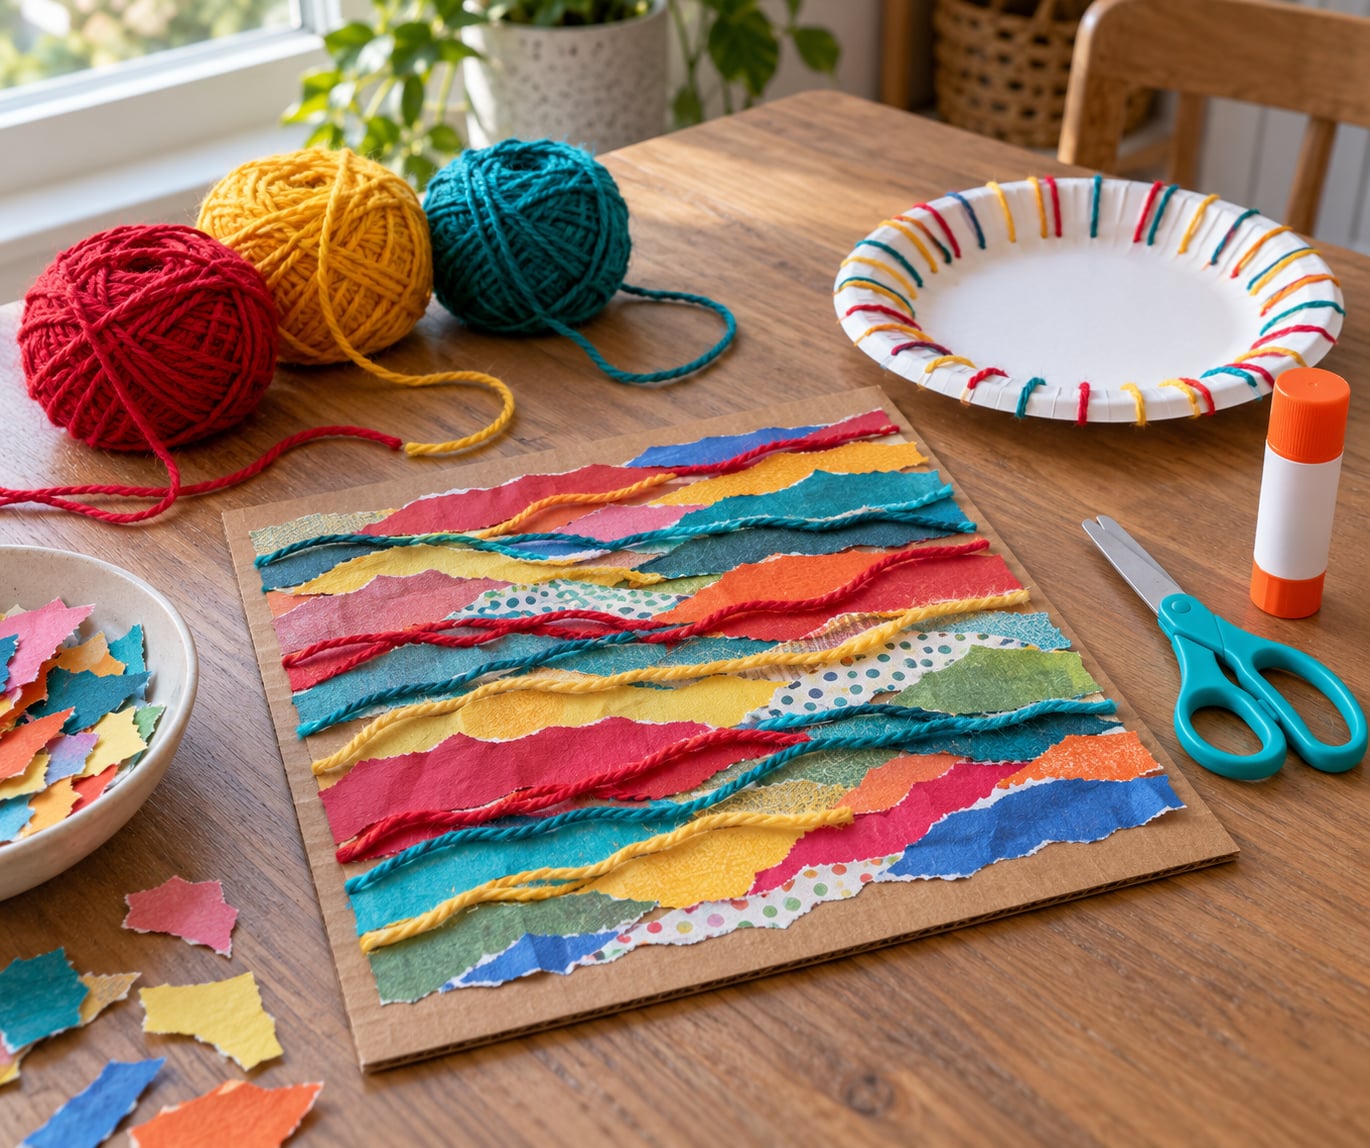
This is where most families should start, because it needs no yarn-handling skill at all. You tear colored paper into long strips that behave like yarn, then let your child glue them wherever they like.
You need: two colors of paper, a piece of cardboard, a glue stick, and a few scraps of real yarn to lay on top when it is done.
- Tear the paper into strips roughly finger-width, using the edge of a hand rather than scissors for younger children.
- Glue the strips onto the cardboard in loops, waves, or rows. There is no right answer, which is the appeal.
- Glue a few real yarn pieces across the collage so they can compare a torn strip with a real strand.
For a three-year-old, skip the scissors and do the tearing yourself. A five-year-old can handle blunt-tip scissors and gets real value from choosing which color goes where.
2. Simple yarn-wrapped cardboard letters
Trace a large letter on cardboard, cover it with glue, and wind yarn around the shape. It takes about ten minutes and the finished piece usually goes straight on a bedroom door.
You need: cardboard, a pencil, yarn, glue stick, and a strip of double-sided tape for the loose end.
- Draw a chunky letter about the size of your hand and cut it out with an adult helping if needed.
- Run the glue stick over the whole face, then press the yarn down in long diagonal sweeps.
- Wrap the last inch of yarn in tape so it cannot unravel, then add dots or a name underneath.
Wrapping a curved letter such as an O or an S is a genuine test of steady pressure, and the tape trick at the end is what separates a finished letter from a pile of loose yarn on the floor.
3. Paper plate yarn bowl
A paper plate becomes a shallow decorative bowl when you wind yarn around its rim. It is the craft I hand to a child who claims they cannot do crafts because their hands do not cooperate.
You need: a paper plate, yarn, glue, and paint or a marker for decorating the center.
- Color or paint the flat middle of the plate and let it dry completely.
- Glue the yarn end to the outer rim, then wind it around and around the edge, overlapping each loop slightly.
- Finish at the back of the plate and secure with a small dab of glue.
Winding in one direction only is the whole trick. Switch directions and the yarn walks across the rim instead of stacking, and you will be redoing it.
4. Pom-pom creature
Yarn crafts for kids beginners: skipping the needle entirely
A pom-pom is the classic first yarn project because there is nothing to get wrong. Wrap, tie, cut, fluff, and glue onto a paper body.
You need: one skein of yarn, a pair of scissors, cardboard strips, glue, and small paper circles for eyes.
- Wrap yarn around a wide piece of cardboard roughly 5 cm, keeping the layers neat rather than loose.
- Slide the yarn off, pinch the middle, and tie it tightly with a short length of yarn.
- Cut the loops at both ends, fluff with your fingers, and trim the shape round.
- Glue the pom-pom onto a cardboard or paper body and add eyes, ears, or feet.
If you have a cardboard tube from a toilet roll, glue the pom-pom on top and the same pom-pom becomes an owl, a hedgehog, or a caterpillar. Treat it as a real milestone rather than a warm-up: wrapping, tying, and trimming asks more hand control than most adults expect from a child’s first fiber project.
5. Yarn snake or worm
A braided or coiled yarn snake is the fastest project on the list and doubles as a toy that moves. Most children finish it in under ten minutes, which makes it ideal for a restless afternoon.
You need: three strands of yarn the same length, a paper tube for the body, and felt or paper for eyes and a tongue.
- Hold three equal strands together at one end and braid them to the bottom of the tube.
- Tuck the braid under the tube and glue it in place, then bind the loose end with a short piece of yarn.
- Glue on paper eyes and a forked tongue.
Play value is the point here. A yarn snake that slithers down a hallway holds a child’s attention far longer than the ten minutes it took to make.
6. Yarn-wrapped tin pencil holder
A small clean tin wrapped in yarn turns into a desk organizer that survives being dropped on a school bag. It is the first project on this list that rewards patience.
You need: a small metal tin with the label removed, yarn, glue stick, and a scrap of felt for the base.
- Wash and dry the tin, then peel off every bit of the paper label.
- Cover the sides with glue in small sections, pressing the yarn on as you go rather than trying to do the whole tin at once.
- Wrap the top rim and the base edge in a contrasting color to tidy the joins.
Glue dries faster than most children expect, so work in sections and let each one set for a minute. A six-year-old will need you to hold the tin steady; a nine-year-old can do the whole thing alone.
7. Cardboard loom weaving
The cardboard loom is the old reliable of kids’ weaving projects, and it is the point where a beginner starts making decisions rather than just gluing. It is also the longest build on this list, so budget half an hour and avoid starting it right before dinner.
You need: two pieces of cardboard, yarn, a blunt tapestry needle or a thick knitting needle, and scissors.
- Cut a notch on the left and right edges of each cardboard piece, about 3 cm down.
- Wrap yarn around the top notches 20 times or so, then every notch below to build the warp.
- Tuck the weft yarn under the warp with the needle, changing position over, under, over, under from row to row.
- Cut the yarn from the loom when the strip reaches the height you want, then tie off the last row.
Weaving too tight is the standard beginner mistake. If the yarn bends instead of sitting straight between the warp threads, tell your child to pull the weft gently rather than yanking it, and remind them a loose weave can be pushed back to even with a finger afterwards.
8. Yarn sun catcher
A cardboard ring wrapped in yarn and hung in a window gives kids a project that changes with the weather. It looks best on a bright afternoon, which is a good excuse to time it well.
You need: a cardboard ring from an old cereal box or lid, yarn, clear plastic tape or glue, and tissue paper or thin card for the middle.
- Cover the ring with yarn in bands, changing color whenever you like.
- Tape or glue a square of tissue paper across the ring.
- Add a few short yarn strands across the paper for a woven look, then hang it with a length of yarn.
This is a good five-year-old project because there are three separate jobs and none of them demand precision. Swap the tissue for a small square of drawing paper and children can decorate the center with faces or leaves.
9. Yarn bookmark
The bookmark is the first project here that uses a needle, and it is deliberately placed at number nine. Children who have finished a few no-sew projects are usually ready for the slow, satisfying work of simple stitching.
You need: cardstock cut into a strip, yarn, a blunt needle, and tape.
- Cut a cardstock strip about 5 cm by 20 cm and trim a shallow point at one end.
- Make a row of evenly spaced holes with a pencil, then pierce them with the needle.
- Use a long piece of yarn and tape one end to the back of the card before you start sewing.
- Stitch through every hole with a simple running stitch, then wrap yarn across the front and back in short bands at the top.
The taped starting end is the trick nobody mentions until their yarn pulls straight out halfway through. Punch holes closer together near the point so the tip holds its shape.
10. Yarn picture frame
A cardboard frame gives a child a project with a real design decision inside it: what goes in the middle. It works well as a keepsake rather than a decoration.
You need: cardboard, yarn, glue, and small found or paper items such as buttons, leaves, ticket stubs, or cut-out shapes.
- Cut a rectangle, then a smaller rectangle from the middle to leave a frame border.
- Wrap the border with yarn, gluing as you go, and vary the color as you move around the corners.
- Glue the small items onto the center card and slide it behind the frame.
Stick to paper, card, and fabric for the small pieces. Beads and very loose small parts look lovely and then become a genuine choking risk for a younger sibling wandering past the table.
Frequently Asked Questions
What type of yarn is easiest for kids to use?
Worsted weight acrylic is the easiest choice for most children. It is thick enough that small fingers can grip and see it, soft enough not to irritate skin, and cheap enough to buy in several colors. Avoid anything called lace or sock weight for a first project, and hold off on pure wool if the child tends to put things near their mouth.
How can I help a young child use yarn safely?
Under three, skip yarn around the neck entirely and use thick paper strips instead. From three up, supervise the whole time, keep sessions under about twenty minutes, and sit with scissors within reach rather than across the room. Anything under 4 cm is a choking risk, so skip buttons, beads, and small pom-poms around younger siblings.
Can I make these crafts without buying special supplies?
Yes, and most of these projects already assume you do. Cardboard from delivery boxes, paper plates, cereal box rings, tin cans, and paper scraps all come from around the house. The only genuine purchase is yarn, and a single skein plus some short ends from earlier projects will carry a family through several of these crafts.
What glue works best for yarn crafts with cardboard?
A glue stick is the right default for beginners. It grabs cardboard quickly, gives children a few seconds to reposition the yarn before it sets, and cleans up with a damp cloth. School glue or white glue works too but needs longer to dry. Avoid hot glue guns around children entirely; the burns happen faster than a child can pull a hand away.
How do I keep yarn from tangling while children work?
Cut yarn into set lengths before the session starts rather than letting children pull from the skein, and wind each piece around a cardboard tube. Keep one color per tube and give each child only the colors for that project. A shallow bowl or basket for unused yarn pieces stops them ending up under the chair.
Which yarn craft is best for a complete beginner?
The paper plate yarn bowl. There is nothing to measure, no pattern to read, and a mistake means unrolling and starting again, which costs nothing. It finishes in about fifteen minutes, and the repetitive winding gives young hands something to do while you decide whether they are ready for something with more steps.
Where to Start
Begin with the paper plate yarn bowl or a wrapped cardboard letter, and give yourself one skein of worsted acrylic in three colors. Set the yarn out in cut lengths, put a bowl on the table for scraps, and let your child pick the colors and decide when the project is finished.
That last part is the real trick. When a yarn craft ends because the child says it is finished rather than because you said so, you have a good chance of getting another quiet afternoon out of them. There are more yarn crafts for kids beginners in the at-a-glance table above, and the loom is worth saving for a weekend when nobody is in a hurry.