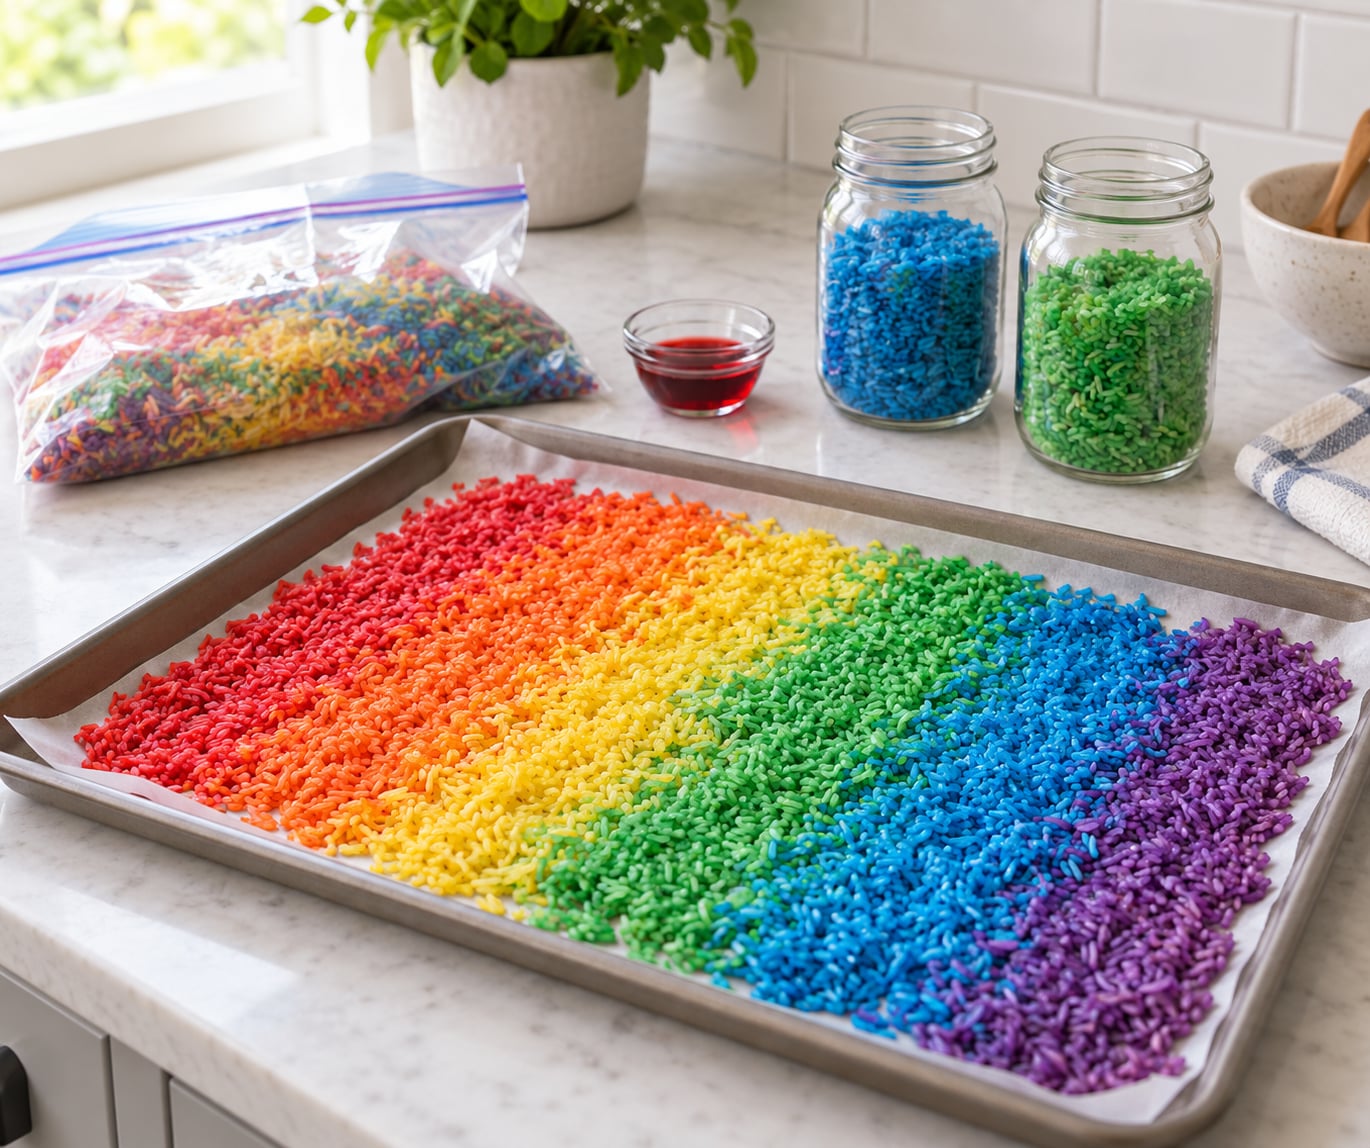
To dye rice for sensory bins, put one cup of uncooked white rice in a sealable bag, add a teaspoon of white vinegar or rubbing alcohol and 8 to 10 drops of food coloring, shake until every grain turns, then spread it on parchment and dry it completely. Hands-on time is about ten minutes per color. The drying is passive, so do several colors while you wait.
I keep a batch of rainbow rice in a lidded bin now because once a child gets the idea of pouring and scooping, the same filler carries through themed bins, letter matching and quiet sorting for months. The whole method is one bag, one spoon of liquid and a little patience with the drying stage.
Updated for 2026
Table of Contents
- What You Need
- Step-by-Step: How to Dye Rice for Sensory Bins
- Step 1: Rinse and Drain the Rice
- Step 2: Choose a Food Coloring Method
- Step 3: Color the Rice
- Step 4: Drain and Dry the Rice
- Step 5: Test and Store the Colored Rice
- Common Mistakes
- Frequently Asked Questions
- Can I use regular food coloring to dye rice for sensory bins?
- What is the best coloring to use for sensory-bin rice?
- How can I stop the rice from staining my child’s hands?
- How long does dyed sensory-bin rice need to dry?
- How should I store dyed rice after making it?
- Can toddlers play with rice that has been dyed with food coloring?
- How to Make Your First Sensory Bin
What You Need
This is the per-color list for one cup of rice. Scale it up and you have a full rainbow set.
- 1 cup uncooked white rice (about 190 grams dry weight)
- 1 teaspoon white vinegar or 1 teaspoon isopropyl alcohol
- 8 to 10 drops liquid food coloring, or 3 to 4 drops of gel coloring
- 1 sealable plastic bag with room at the top for the rice to move
- Parchment or wax paper and a baking sheet, plus a spoon or spatula
Long-grain white rice gives the brightest color because there is nothing to show through. Brown rice works and looks warmer and more natural, but the color reads a little muddier. Arborio is the most interesting to handle because the grains are short and plump, which suits scooping and pouring practice.
| Rice per color | Vinegar or alcohol | Liquid food coloring |
|---|---|---|
| 1 cup | 1 teaspoon | 8 to 10 drops |
| 2 cups | 2 teaspoons | 15 to 20 drops |
| 5 cups | 1 tablespoon | 40 to 60 drops |
For secondary colors, mix two primaries in the bag rather than hunting for a premixed shade. Roughly equal parts red and yellow makes orange, red and blue makes purple, and blue and yellow makes green. Gel coloring needs far fewer drops, so add two, shake, and go from there.
One safety note before you start. Dyed rice is a craft material, not food, so keep it out of any situation where it might be eaten. Supervise closely with children under three, who still mouth things, and keep the rubbing alcohol bottle out of reach while you measure it. If you use alcohol, let the rice dry fully and for a little longer than you think you need to.
Step-by-Step: How to Dye Rice for Sensory Bins
Step 1: Rinse and Drain the Rice
Rinse the rice in a bowl under cool water until the water runs mostly clear, usually four or five changes. This removes the surface starch that would otherwise make grains stick to each other and to the bin walls.
Drain it in a sieve for five minutes, then press out any excess water with the back of a spoon. You want damp rice, not wet rice, and if water is still pooling under the sieve it will dilute the dye and give you a weak, uneven color.
Step 2: Choose a Food Coloring Method
There are three practical routes, and they differ mostly in how saturated the color comes out and how fast the rice dries.
Liquid food coloring plus vinegar is the everyday method and the one most families use. The vinegar is not there for flavor or cleaning. It helps the dye spread across the grain instead of beading up, which is what gives you an even color with no white patches.
Gel coloring plus a splash of vinegar gives the most saturated, crayon-like color per drop. The gel sticks to the outside of the grain, so it holds up better to repeated pouring and scooping. It dries a little slower, so give it extra time on the sheet.
Powdered drink mix plus a few drops of water is the scented option. It colors and perfumes the rice in one step, which makes a strawberry or lemon bin feel like a treat. There is no blue drink mix in most stores, so use yellow powder with a few drops of blue coloring if you want green.
Rubbing alcohol works in place of vinegar and dries faster, which is handy on a humid day. The color comes out slightly deeper. Waiters and teachers have used it for years, and once the rice is bone dry the alcohol has long since evaporated, but skip it if you have a child who mouths everything they pick up.
Step 3: Color the Rice
Put the drained rice in the bag first, then add the teaspoon of vinegar and the coloring. Adding liquid to loose rice first just pools at the bottom and stains it unevenly.
Seal the bag, squeezing out the air, and shake hard for about a minute. The trick is to let the rice fall: hold the bag at both ends, swing it up and down, then massage and shake again. Keep going until you cannot see any pale grains through the plastic.
If the shade is too light, add four more drops and shake again rather than pouring in more liquid. Too much liquid is the most common reason a batch turns pasty and takes forever to dry. Check through the bag against a window or a white sheet of paper to judge the color honestly.
Step 4: Drain and Dry the Rice
Tip the colored rice onto parchment paper on a baking sheet and spread it into a thin, even layer, one grain deep where you can. Scrape it apart with your fingers first, because damp rice arrives as a solid clump. Pat the top with a paper towel to lift any dye pooled on the surface.
Leave the sheet in a dry spot for two to three hours, turning the rice once. Then run a finger through it. If no color comes off and the grains feel dry and separate rather than cool and slightly tacky, it is ready for a bin.
| Drying method | Time | Good to know |
|---|---|---|
| Air dry on parchment | 2 to 3 hours | No heat, no fumes, works in any room |
| Bake at 220F, 15 to 20 minutes | 15 to 20 minutes | Fastest route on a humid day; keep the room ventilated |
| Spread on a towel, roll and press | About 30 minutes | Good for small batches you need in a hurry |
If you bake, use a low oven and stay in the kitchen. The colors set better when the rice is warmed rather than fried, and a hot oven can bake the dye onto the surface so it flakes off later instead of staying put.
Step 5: Test and Store the Colored Rice
Rub five or six grains firmly between your thumb and finger. That is the real dryness test, and it is the one that tells you whether your child will come out of play with blue palms. A faint dusting on the paper towel is fine. Bright color on your fingertip means another two hours on the sheet.
Once it passes, let it cool completely and store it in an airtight container in a cool, dark cupboard away from the oven. Label the lid with the color and the date. Properly dried rice in a sealed jar keeps for most of a year; if it feels cool or clumpy when you open it, or smells musty, throw it out rather than handing it to a child.
Common Mistakes
Patchy color with white grains showing. You did not shake long enough or left no headspace in the bag. Rice needs room to tumble. Massage the clumps between your fingers, add a drop of liquid, and shake again for another minute.
Rice that is too wet and pasty. Too much vinegar or alcohol, or too many drops of coloring. Spread it thinner and dry it longer, or restart the batch with half the liquid. Thin layers dry fast; heaped ones do not.
Stained hands and surfaces. This is the one every parent asks about, and the fix is drying time, not gloves. Run the finger test, give it another two hours if any color lifts, and rinse hands with warm soapy water rather than scrubbing. A thin film of hand cream before play helps a bit. If your child is still stained after all that, cheap gloves for the first session or two are a fair trade.
Colors bleeding into each other. You mixed everything in one bag, or you wet the rice again on purpose. Dye one color per bag, and never rinse colored rice. If you want a blended ombre effect, layer the colors on the sheet while they are still damp rather than combining them wet.
Clumping in storage. Rice was stored while still warm, so condensation formed and stuck the grains together. Cool it fully on the sheet first, then close the container. Add a folded paper towel to the jar; it absorbs the tiny bit of residual moisture.
Color that looks weak under lights. Most bins sit indoors, and grocery store liquid coloring looks pale in warm light. Double the drops, or switch to gel coloring for one batch and compare the two side by side.
On batch sizing, a shallow sensory bin about 12 by 12 inches holds roughly 4 cups of rice filled to a workable depth. A bigger tub or a full rainbow set of six colors runs closer to 6 cups each. Dye one cup batches while you are at it, because a leftover quarter cup of rice is not a bin, it is litter.
Frequently Asked Questions
Can I use regular food coloring to dye rice for sensory bins?
Yes. The standard recipe uses nothing but grocery store liquid food coloring, about 8 to 10 drops per cup of uncooked rice, plus a teaspoon of vinegar or rubbing alcohol. That is enough for a bright, even color. Regular gel coloring also works and needs only three or four drops per cup, which gives a deeper result because the pigment sits on the outside of the grain. Neither needs to be fancy or natural.
What is the best coloring to use for sensory-bin rice?
Gel coloring gives the most saturated color and the least transfer onto hands, so it is the safest bet for repeated play. Liquid coloring works well for pastel shades and costs you nothing extra. Powdered drink mix colors and scents the rice at once, which children notice immediately. Natural options like beet juice or turmeric produce soft, earthy tones rather than bright colors, so they suit a nature bin better than a rainbow one.
How can I stop the rice from staining my child’s hands?
Drying is the whole answer. Spread the rice one grain deep, let it dry two to three hours or bake it at 220F for 15 to 20 minutes, then rub several grains hard between your fingers. If no color lifts, it is ready. Any dye that lifts with a finger will lift onto hands. For the first session you can also use gloves, and a little hand cream before play adds a barrier that washes off afterwards.
How long does dyed sensory-bin rice need to dry?
Two to three hours when it is spread thinly on parchment at room temperature, or 15 to 20 minutes in a 220F oven. The time is a guideline, not a rule, because humidity and how thickly you spread the rice both matter. The finger test decides it: rub five or six grains together, and the rice is ready when no color comes off and the grains feel dry rather than tacky.
How should I store dyed rice after making it?
Cool the rice completely, then put it in an airtight container in a cool, dark cupboard away from the stove. Keep the lid closed between sessions, because moisture is what causes clumping and mould. A folded paper towel in the jar soaks up any last trace of damp. Stored this way it stays usable for most of a year, but discard it if it smells musty, feels clumpy, or shows any spotting.
Can toddlers play with rice that has been dyed with food coloring?
Yes, with close supervision, and it is one of the gentler fillers you can offer. Under-threes put things in their mouths, so choose food coloring rather than acrylic or poster paint, which are not made to be handled. If you used rubbing alcohol, let the rice dry for an extra hour and never leave the bottle within reach. Skip the bin entirely if your child has a tendency to eat the contents.
How to Make Your First Sensory Bin
Start with one bright color rather than six. Dye a single cup, dry it properly, and pour it into a shallow bin with a layer of scoops, small cups and a spoon on top. Put a cloth or a play mat underneath, hand the child a broom and dustpan for cleanup, and let it sit out for a few days.
When they are bored of plain scooping, add four or five more cups in different colors, bury a handful of small toys or letter tiles, and the same filler turns into a search game. The method above holds up whether you make one batch or a full rainbow, so the second time round you will not need to measure anything at all.